Setting Up to Use Xero
Before you can use Xero with GPM, please ensure you have created a Xero account (https://www.xero.com/) and followed this step-by-step setup guide.
Configure your Organisation in Xero
- Gensolve will provide a public certificate (.cer file) which will need to be stored on your computer.
Note: Please contact the Gensolve Support Desk to request a public certificate.
- Log in to the Xero Developer Portal (https://api.xero.com)
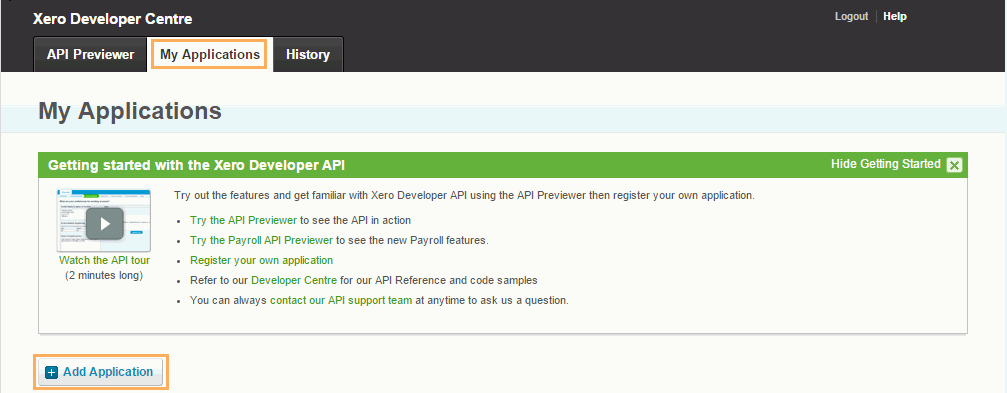
- Go to My Applications >> Add Application
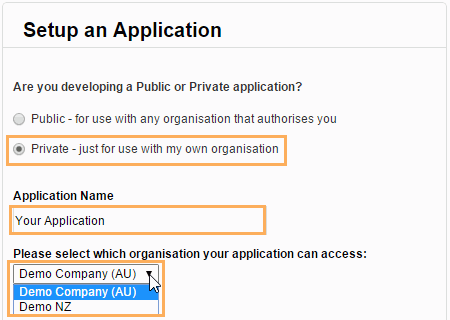
- Select Private and enter a name for your application
- Choose your organisation from the drop down list
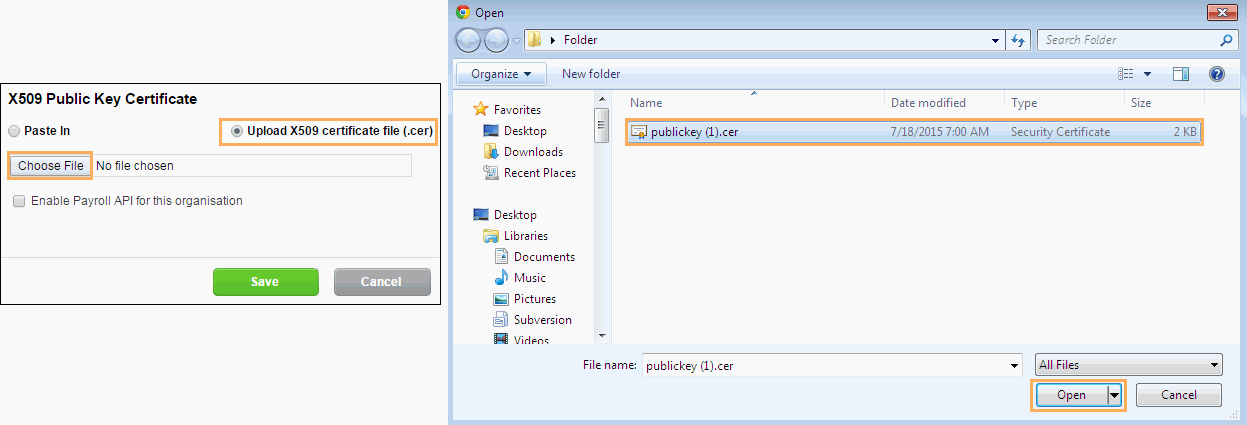
- Upload the public certificate (.cer file) provided by Gensolve (in step 1)
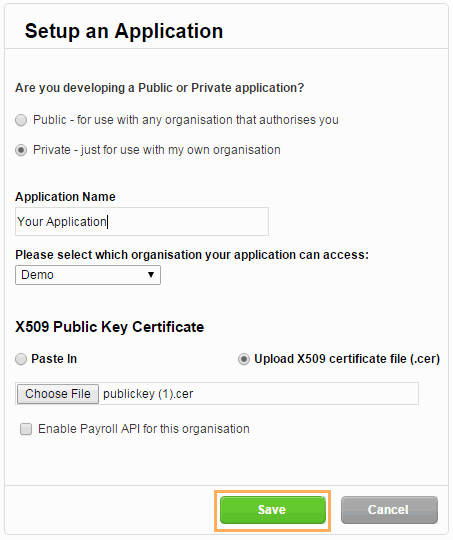
- Click Save.
Configure Vendor Settings in GPM
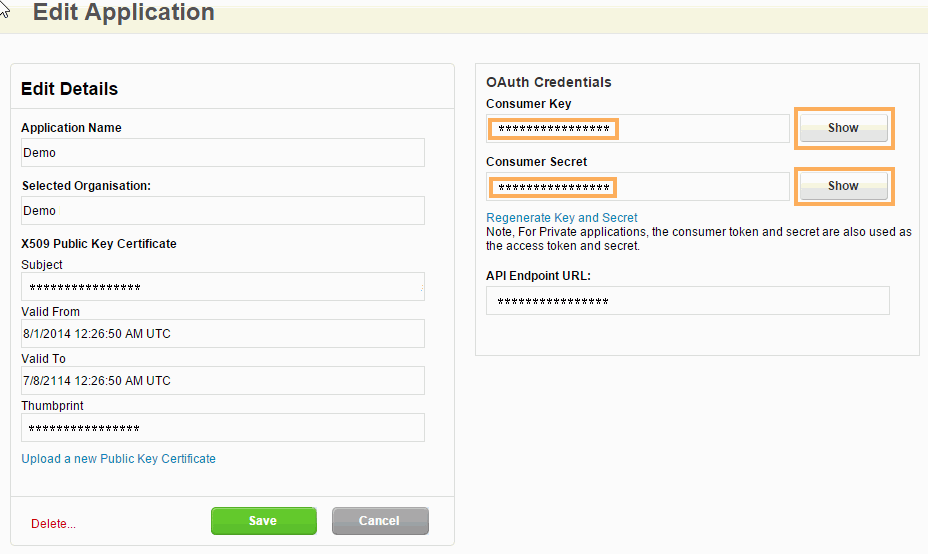
You will now have a Consumer Key to use for your application. Follow these steps to load it into GPM:
- Login to the Xero Developer Portal and go to My Applications
- Select the application you have setup above

- Click on Show to see and copy the Consumer Key
- Log in to GPM, go to Administration >> Vendors and click Get Data
- Click on
 to open the
Vendor Details window
 - Click on the Other settings tab
- Paste the Xero Consumer Key (Consumer Key)
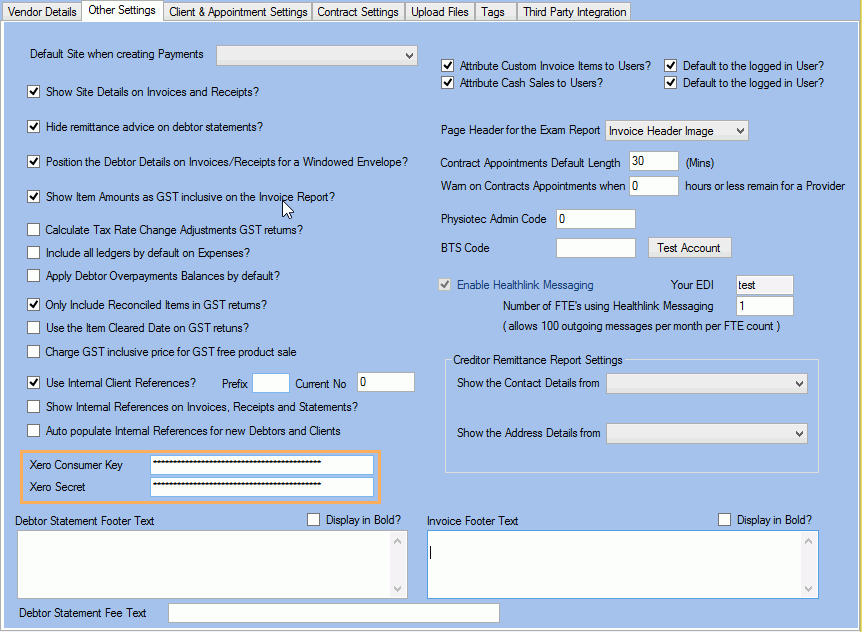
- Repeat step 3 to step 7 to copy and paste the Xero Secret (Consumer Secret)
- Click Save.
One you have clicked on the Save button, you will be able to use the Xero Export option in GPM (Accounting Form >> Chart of Accounts >> Xero Export).
For more information see: Using Xero with GPM.
Configure Chart of Accounts in GPM
You will now be able to match the GPM's Ledger Account Numbers with the Chart of Accounts of your Xero Account. Follow these steps to do this mapping:
- Go to Accounting Form >> Chart of Accounts
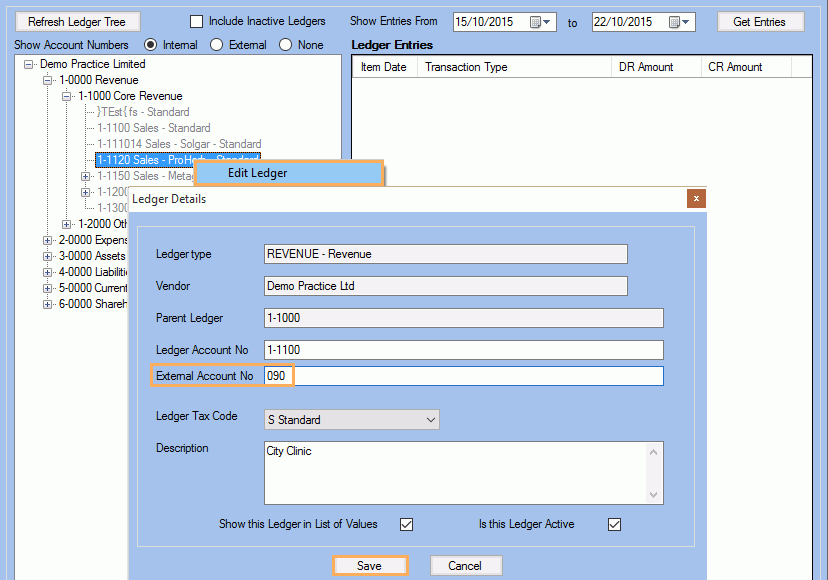
- Right Mouse click on a specific ledger >> Edit Ledger
- Enter an specific External Account No
- Click on Save
- Go to your Xero Account
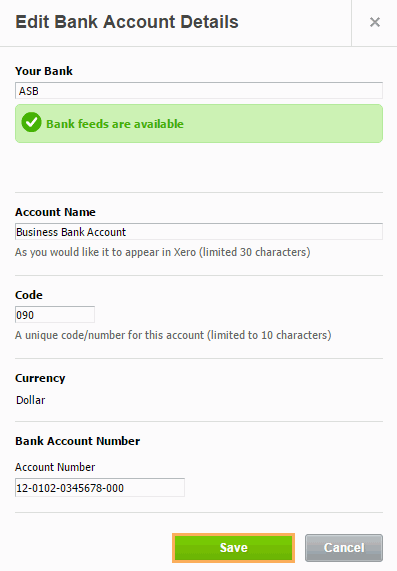
- Go to Settings >> Chart of Accounts
- Ensure these Codes are in accordance with the ones configured in GPM
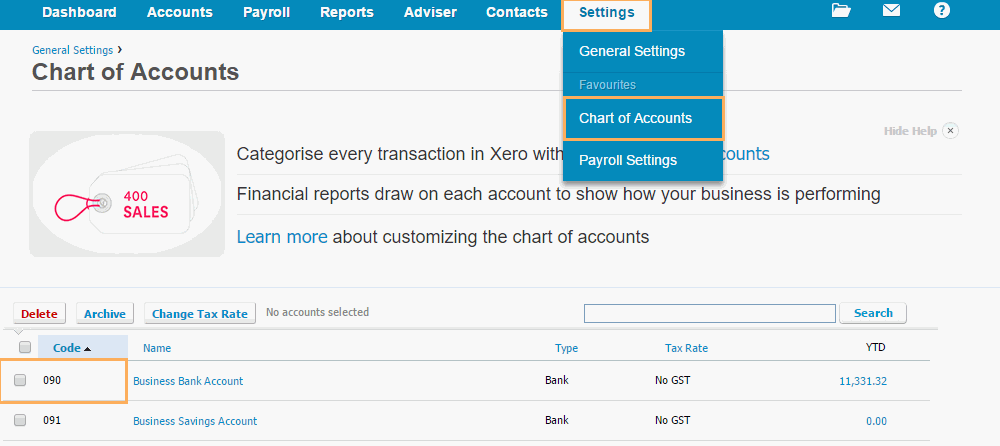
- If required, edit each account settings and click Save
Configure Service Charges in GPM
Follow these steps to assign a sales ledger to your service charges from within GPM:
See also How to Create a New Service Charge.
- Go to Administration >> Service Charges
- Click on
 to open the Appointment Service Charge details window
 - Go to Visibility and Ledgers tab
- If required, click on Add to add a sales ledger to the service charge
- Click on Save
.gif)
Note: When a sales ledger is added and its number has been matched with the Xero's codes, each charge related to this service will be exported successfully.
Configure Products in GPM
Follow these steps to enter the Product Code and assign a sales ledger to your products from within GPM:
- Go to Products >> Products
- Click on
 to open the Product details window
 - Enter a Product Code
- If required, select a specific sales ledger at bottom
- Click on Save
.gif)
Note: When a sales ledger is added and its number has been matched with the Xero's codes, each charge related to this product will be exported successfully.
Apply Item Ledgers in GPM
If a charge has already been used on an appointment before you set the ledgers, it will not be linked to the ledger on the service/product charge.
Follow these steps to apply your changes from within GPM:
See also Accounting Ledgers.
- Go to Accounting Form >> Chart of Accounts
- Go to Apply Item Ledgers
- Filter the data and click on Get Items to Process
- Click on Process Now
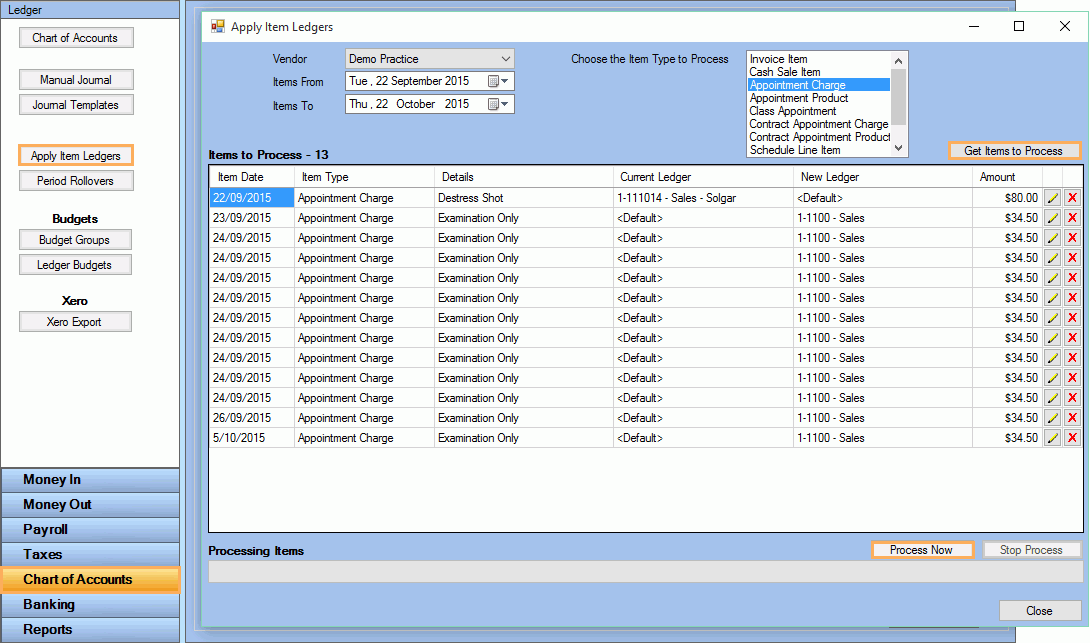
Note: The ledgers set up previously will now be linked to their corresponding Service/Product charge.
Import your Products List into Xero
Once you have configured your products in GPM, you will need to import them to your Xero Account.
Follow these steps to do so:
- Go to Products >> Products
- Click on Export For Xero
- Select a location in your PC to save the .csv document.
.gif)
- Go to your Xero Account
- Go to Accounts >> Inventory
- Click on Import and select Items
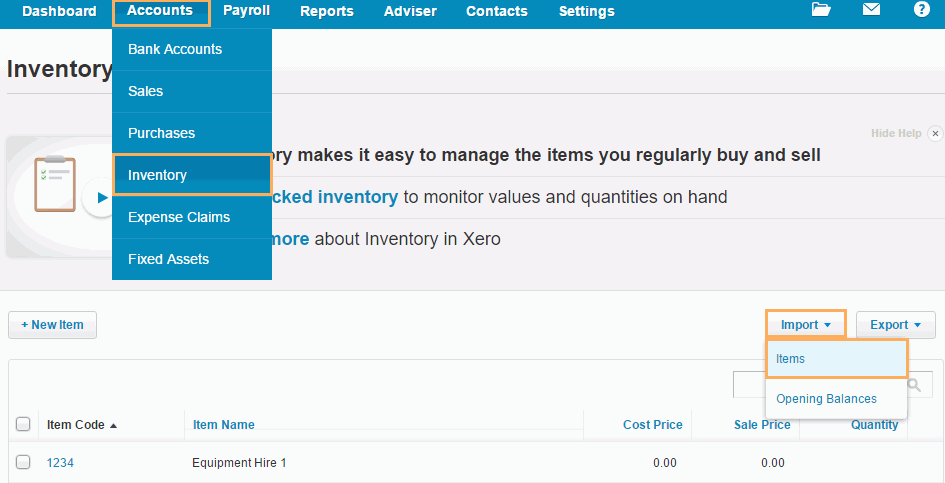
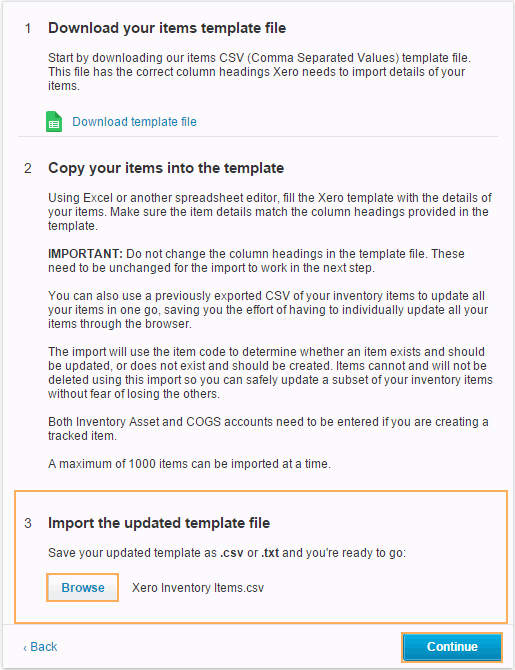
- Choose the Import the Updated Template File option
- Click on Browse and locate the .csv document saved above
- Click on Continue
-
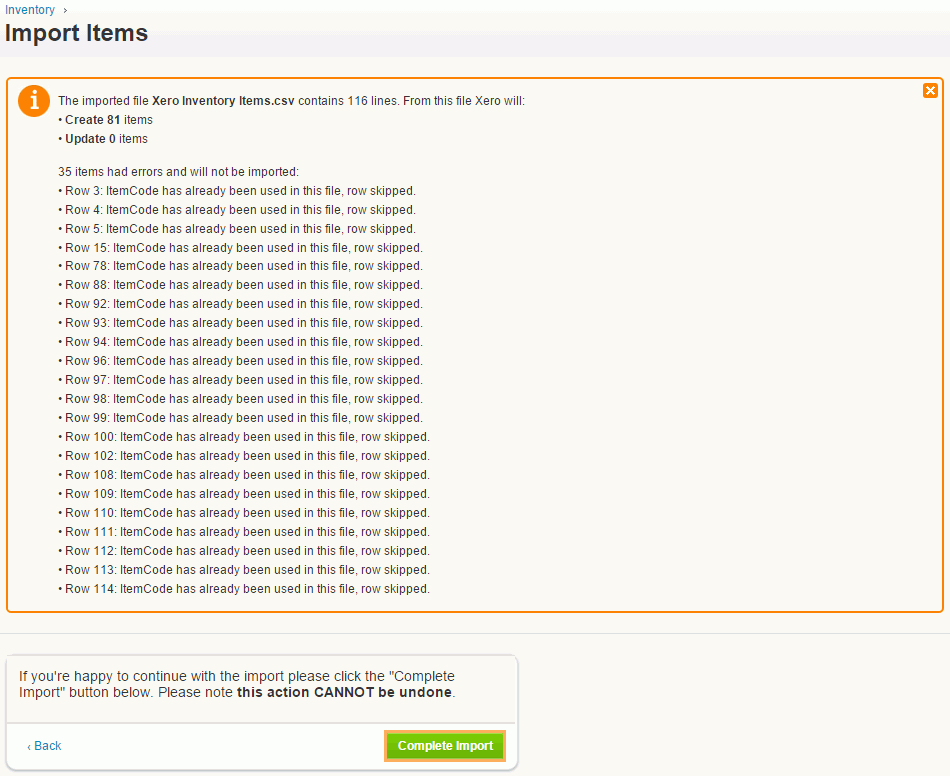
Click on Complete Import
Note: If you get errors when importing products in Xero, follow the steps described in Configure Chart of Accounts in GPM and Error: Account Code is not a Valid Code for this Document in order to match the ledgers with the Chart of Accounts in Xero.
Note: Repeat this process anytime you make changes to your product list in GPM.
If you have any issues importing you inventory, please refer to Help Centre-Import Inventory or Help Centre-Inventory in Xero


