![]()
Creating a Custom Form in AEM
This tutorial will take you through each step necessary to create a Custom Form and to use it for a Client.
Note: Custom Form Design is an advanced feature of AEM. It does require an understanding of digital forms and basic database knowledge.
Estimated time: 60 minutes
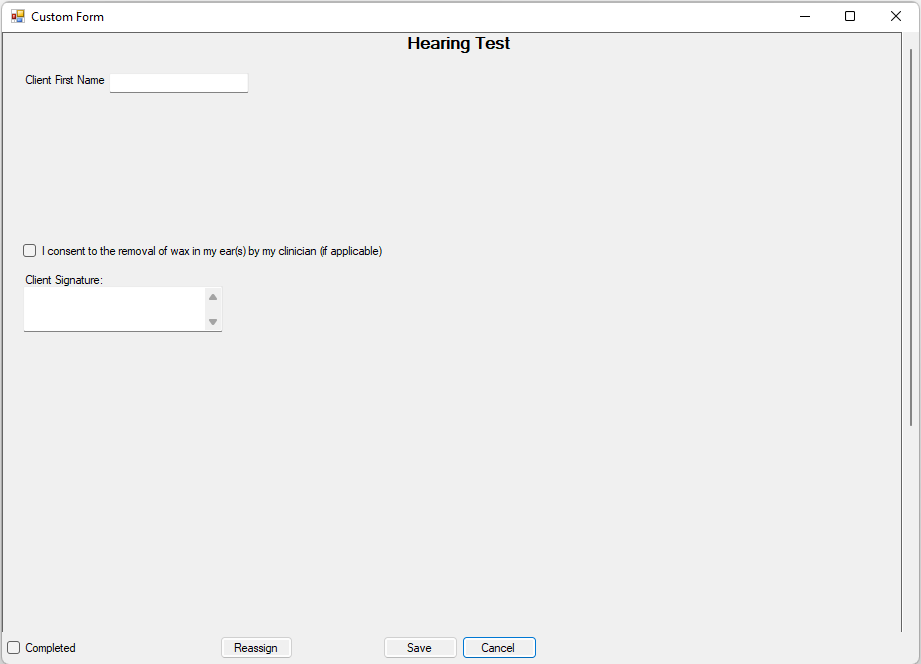
Goal: This is the form that we will be creating through this tutorial
.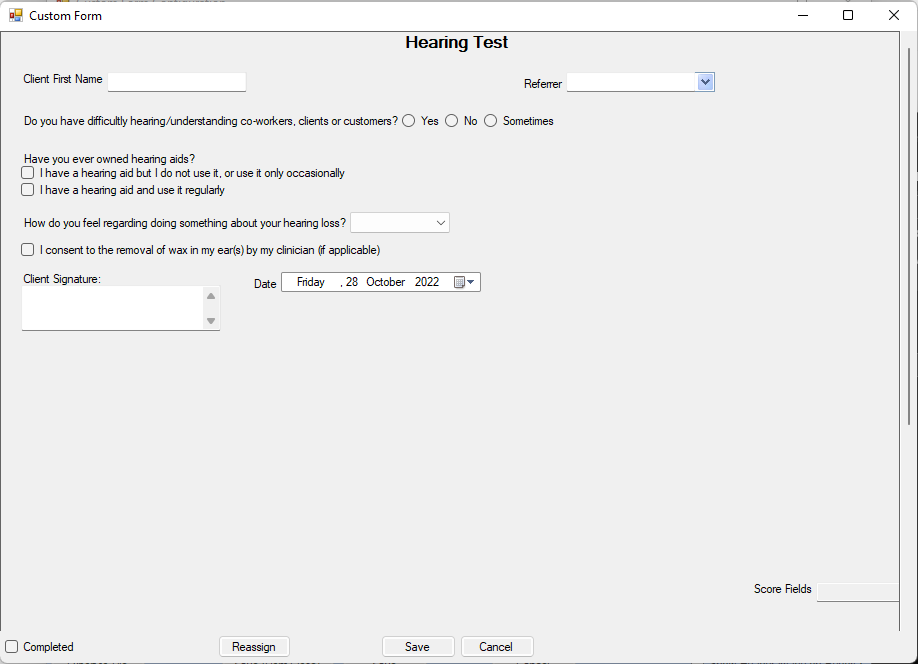
Note: this is the Preview Form for AEM
Creating a Custom Form
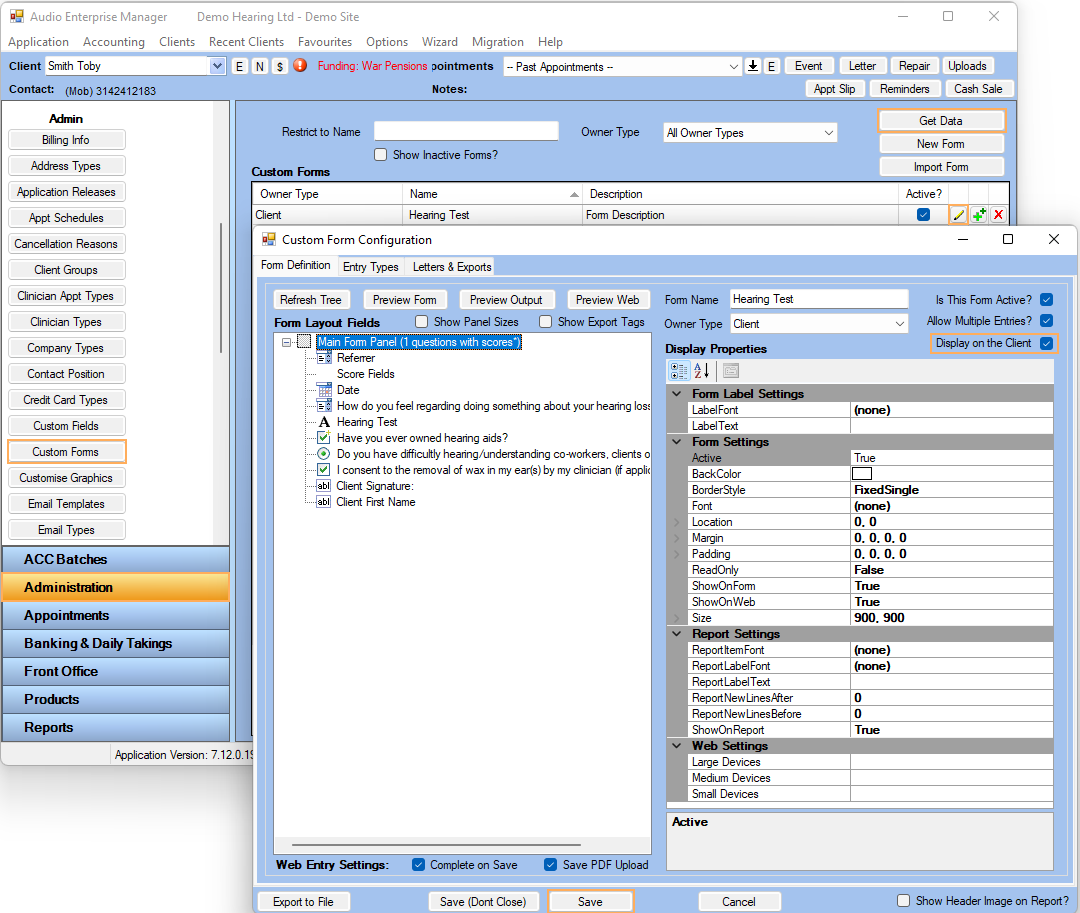
1. In order to create a Custom Form on AEM go to Administration >> Custom Forms >> New Form
2. Enter a name in Form Name >> Select an Owner Type (For our demo we will choose Client)
Note: The different types of Owners will provide different System Fields. Refer to System Fields for more information.
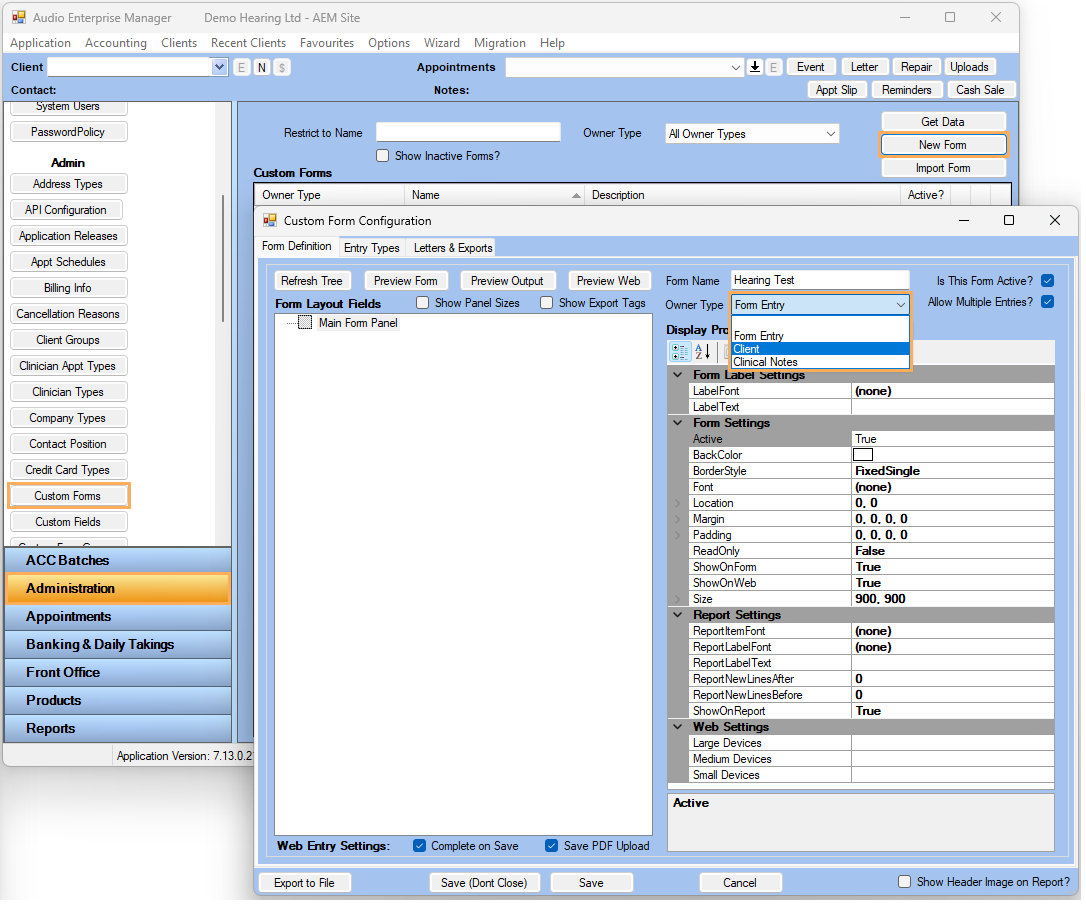
- Use Form Entry if you need to include system fields for Session Site and Session Vendor. Refer to System Fields for Form Entry Forms for more information.
-
Use Client if you need system fields from Client details and Clients General Health (e.g. Client Name, Client Email, Client Phone Number, Client DOB, Health Flags, etc). Refer to System Fields for Client Entry Forms for more information.
Adding different types of fields
There are 3 different types of fields that can be added to our forms. In this section we will add one of each.
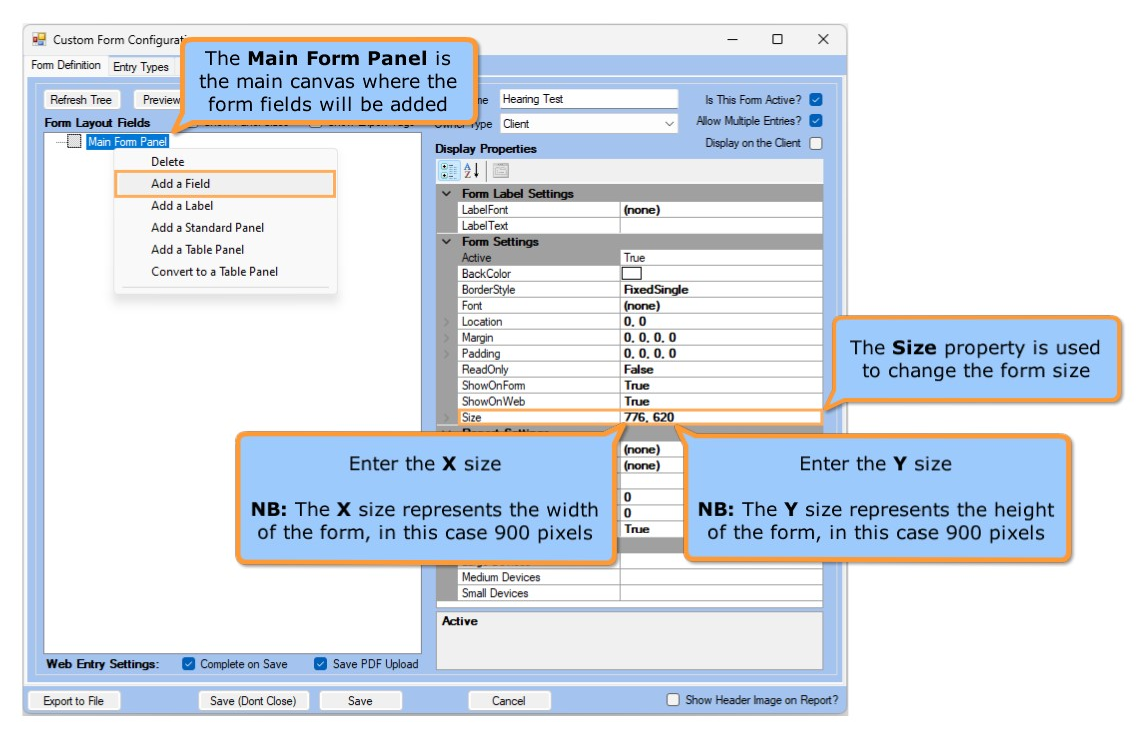
Click on Main Form Panel to view and edit its properties >> Right-click on it and select the Add a Field option
Form Fields
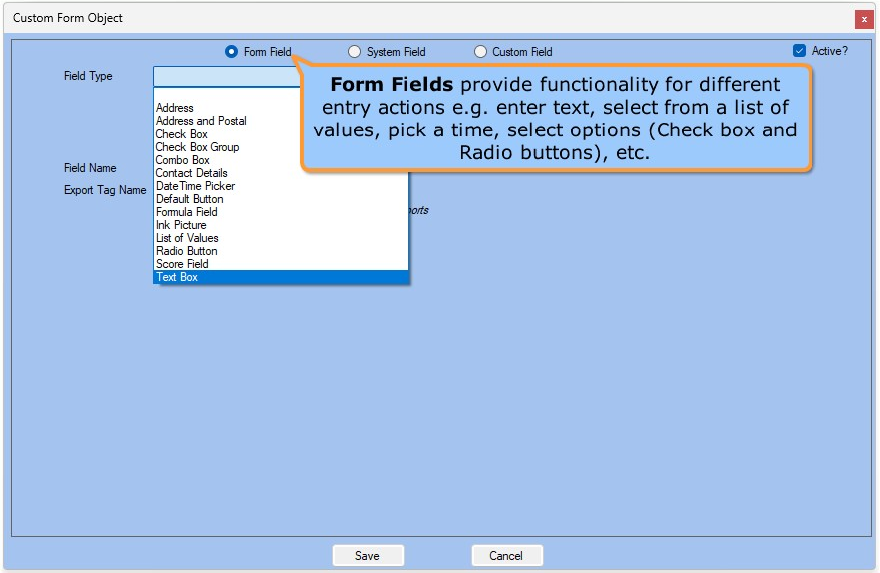
1. When adding a Form Field you can select from the available options on the drop-down menu, in this example we will use a Text Box
2. Enter a Field Name >> Click on Save
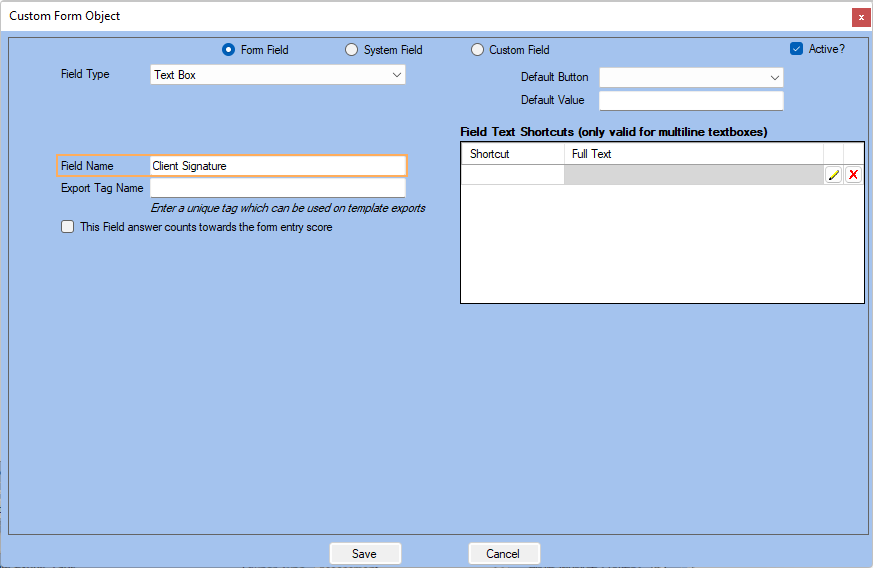
Note: For a basic use, Field Name is enough. Refer to Setting up a Default Button for more information.
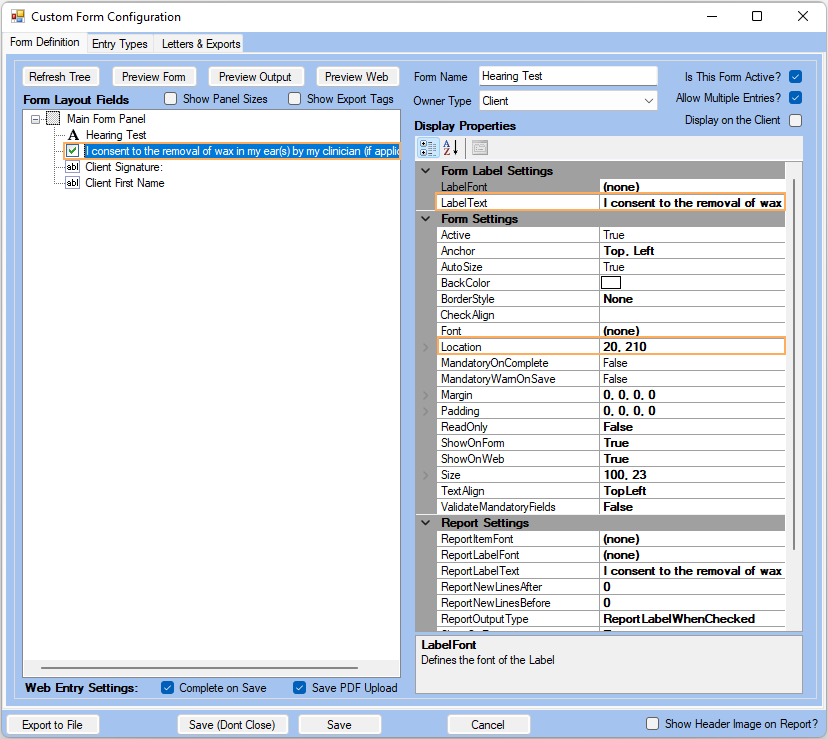
3. After saving, the new form field will show up under the Main Form Panel.
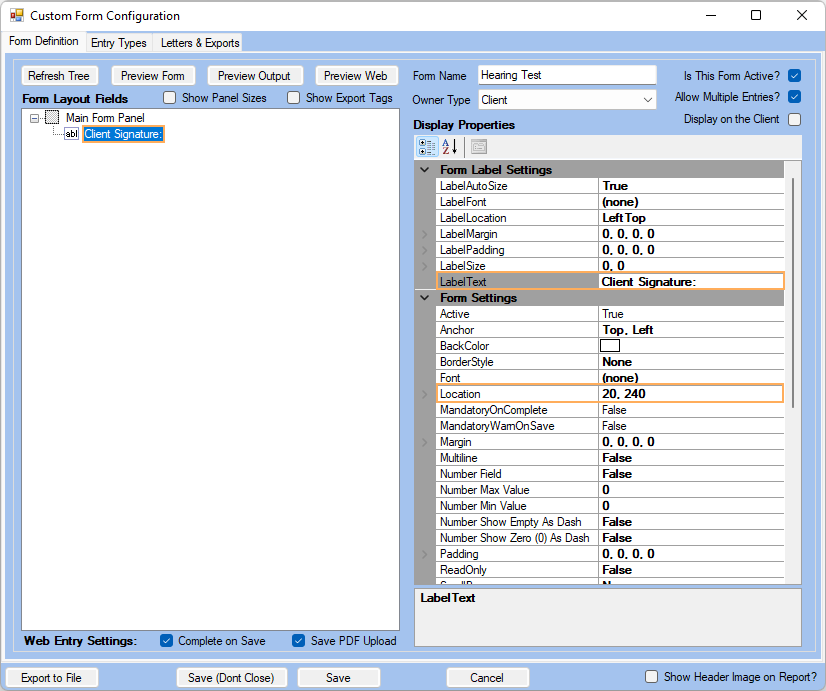
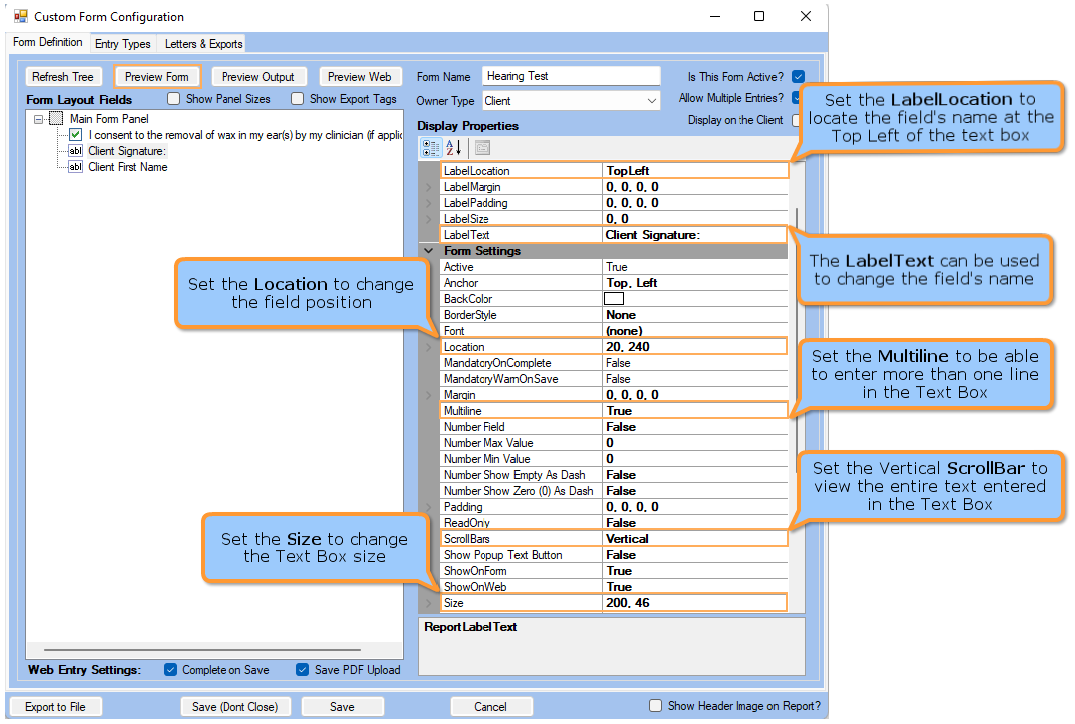
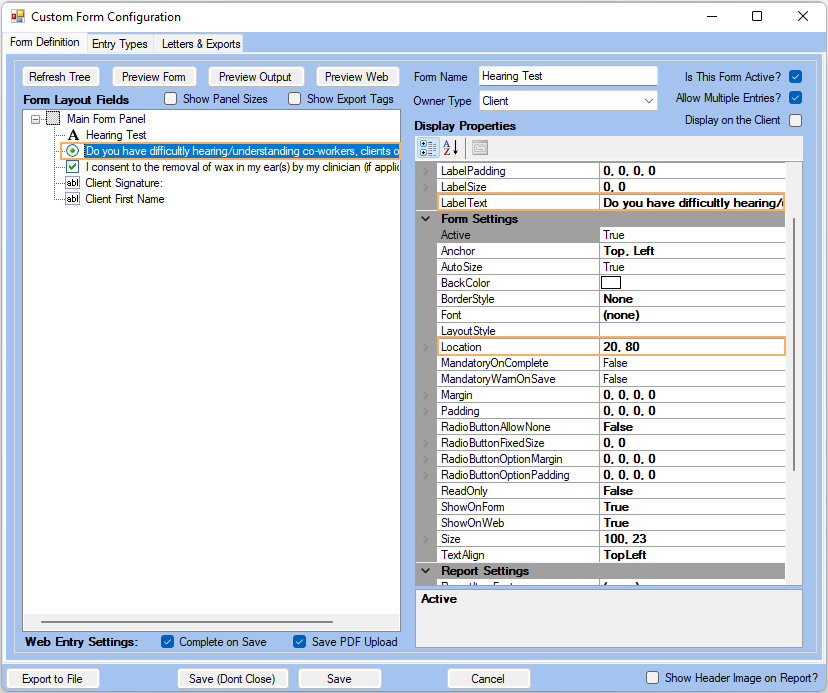
Note: Remember to set Label Text and Location properties on the right-hand side under Display Properties.
System Fields
1. Right-click on Main Form Panel and select the Add a Field option
2. When adding a System Field you can select from the available options on the drop-down menu. In this example we will use Client First Name >> Click on Save.
3. After saving, the new system field will show up under the Main Form Panel.
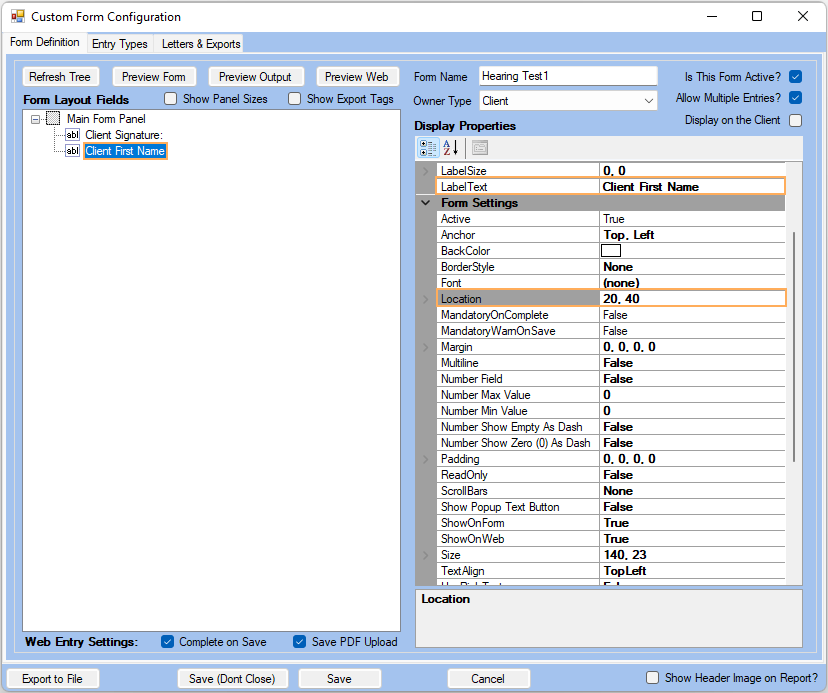
Note: Remember to set Label Text and Location properties so the form can be used in AEM as well.
Custom Fields
1. Right-click on Main Form Panel and select the Add a Field option
2. When adding a Custom Field you can select from the available options on the drop-down menu. In this example we will use an existing Custom Field to get Client Consent >> Click on Save.
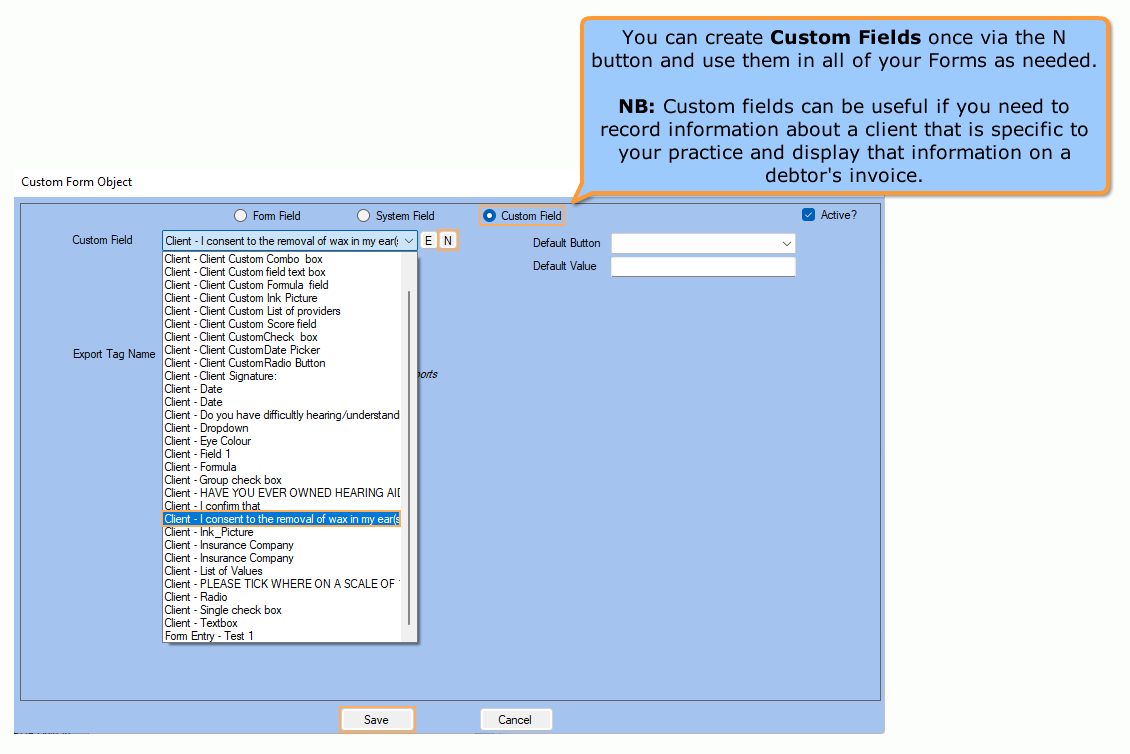
3. After saving, the custom field will show up under the Main Form Panel. You can drag-and-drop fields to organize them.
4. Click on Save (Don't Close) to save your progress and keep working on the form >> Click on Preview Form to see how your Smart Form looks.
Common Fields: Text fields, Check boxes, Radio Buttons, Date Pickers, Scores and Lists of Values
Let's review some of the most common fields used in Custom Forms and how they work.
Note: If you closed your form and want to go
back to it, go to Administration >> Custom
Forms >> Get Data >>
Click on ![]() next to
your form name.
next to
your form name.
-
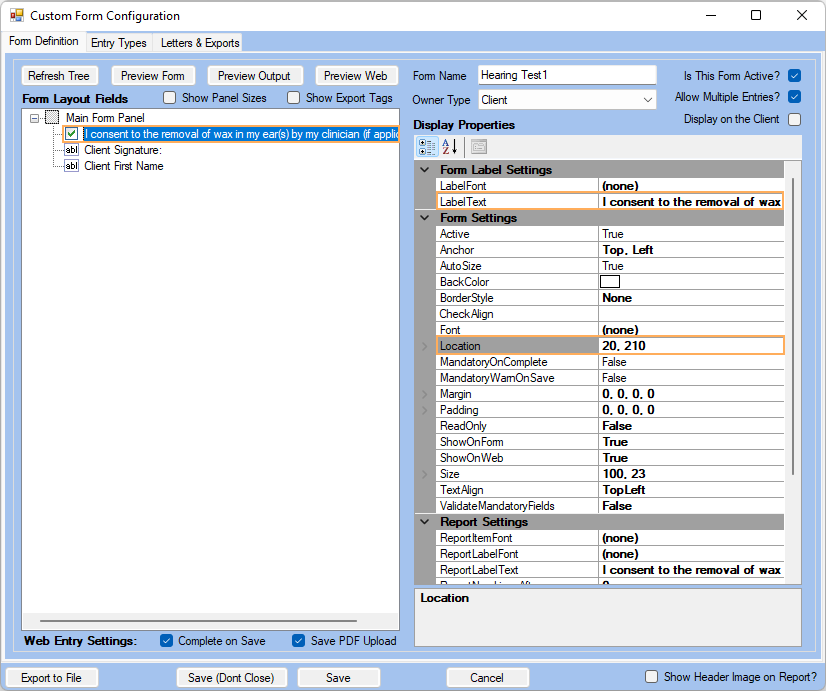
Text Fields and Display Properties
Text Fields
Follow the steps below to get a Preview Form of the AEM Forms.
1. Select the System Field previously added.
2. Set the Display Properties as required (refer to the image).
Note: For more information related to field locations, refer to Changing the Location of a form object.
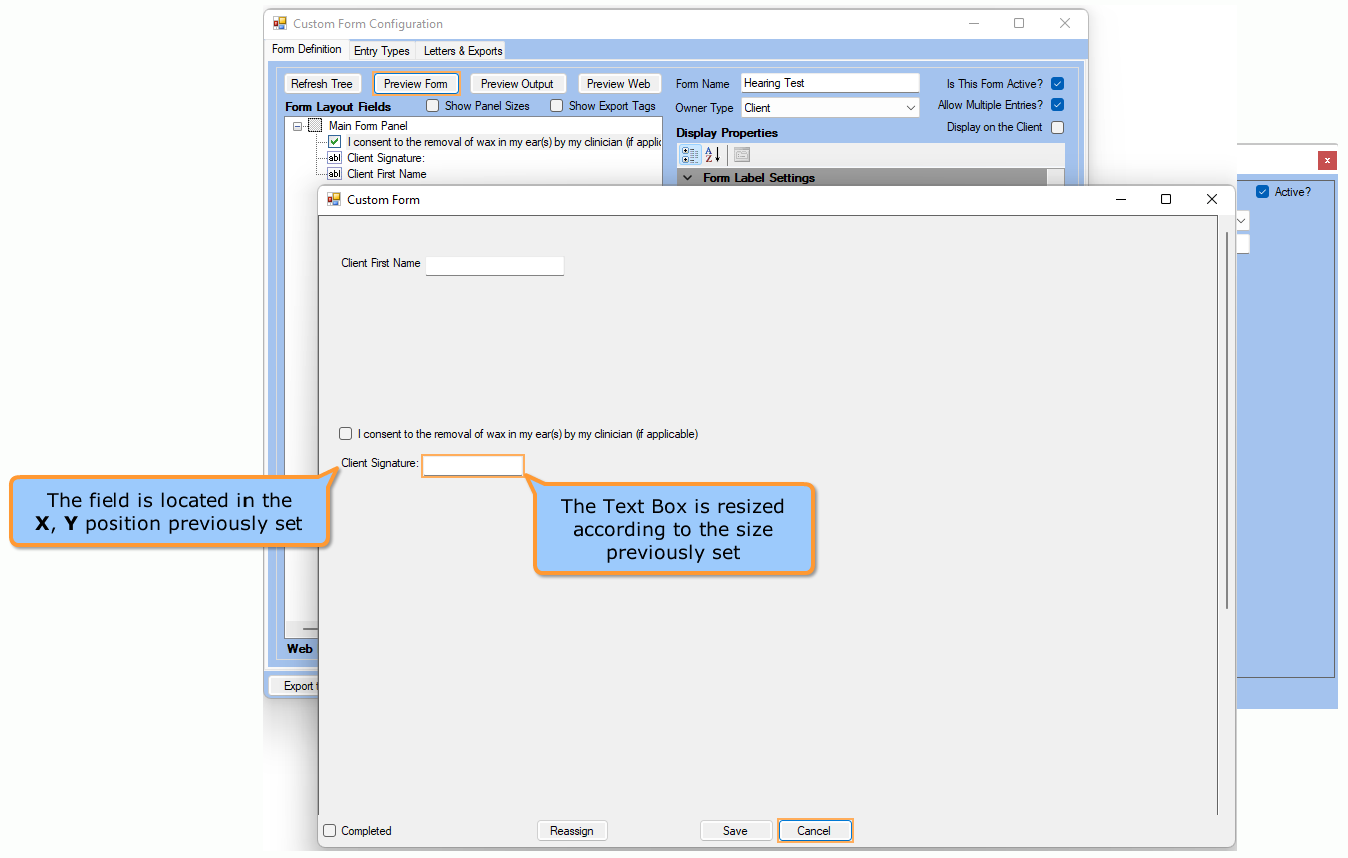
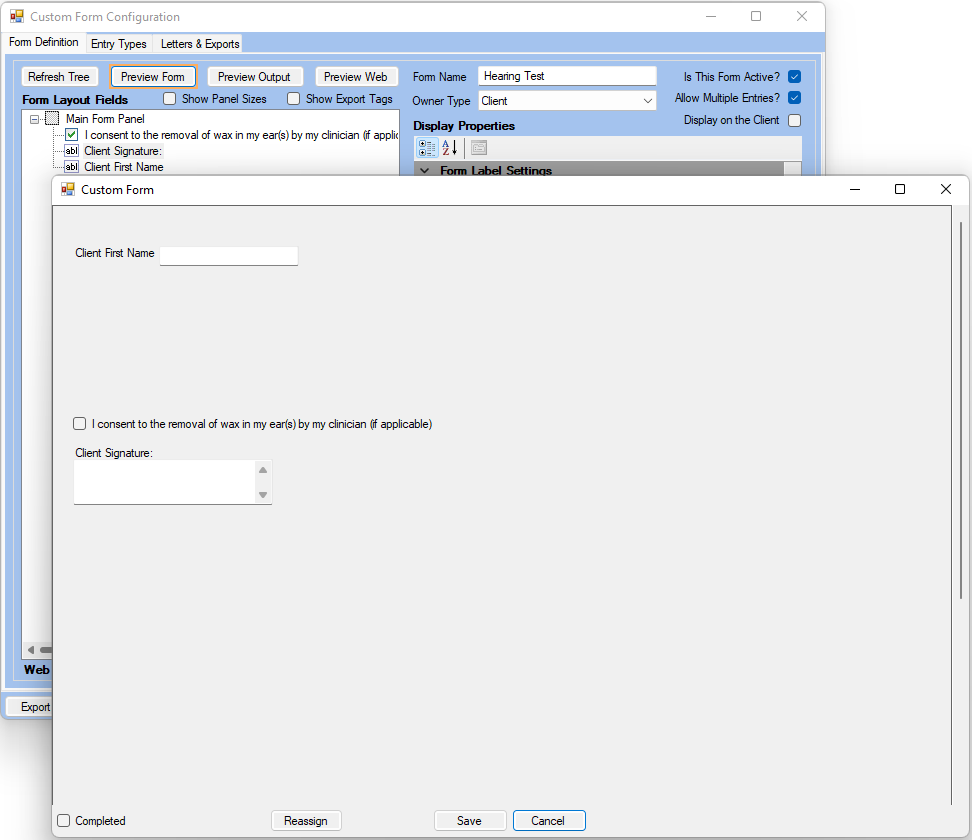
3. Click on Preview Form to view changes reflected in the form. After validating that the changes made are properly displayed, click on Cancel to continue.
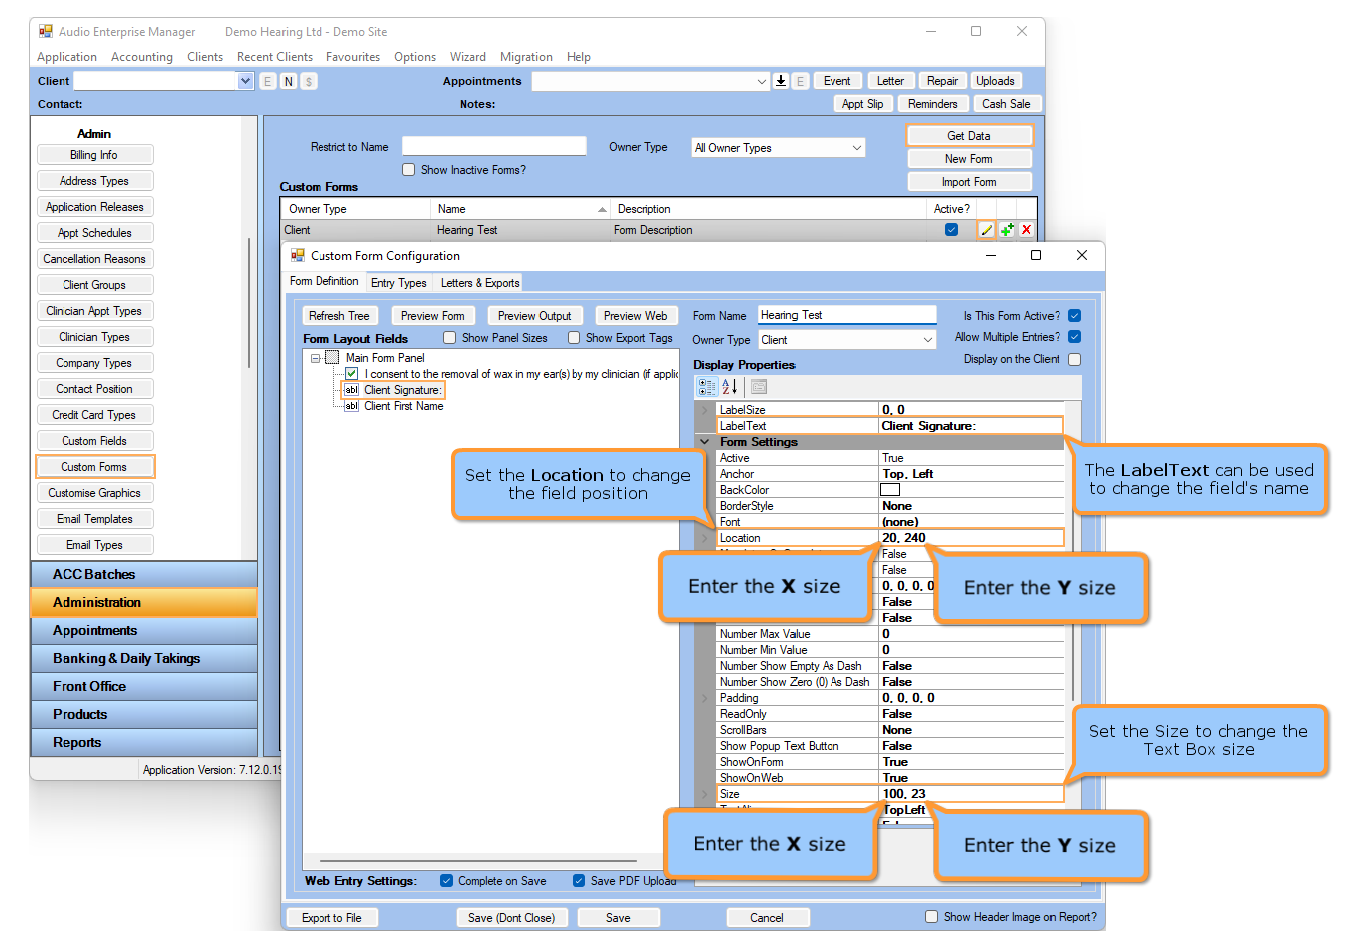
4. You can also view the changes made to field locations by leaving the Preview Form window open while editing them. Click on Preview Form >> Move it to one side of the Form Configuration window >> Change a field location >> Click Save (Don't Close) >> Check in the Preview Form how the field's position changed in the form.
5. Set Display Properties for Form Field previously added.
6. Click on Preview Form to view changes reflected in the form. After validating that the changes made are properly displayed, click on Cancel to continue.
Labels
A Label is a sort of title where fields will be organized under it.
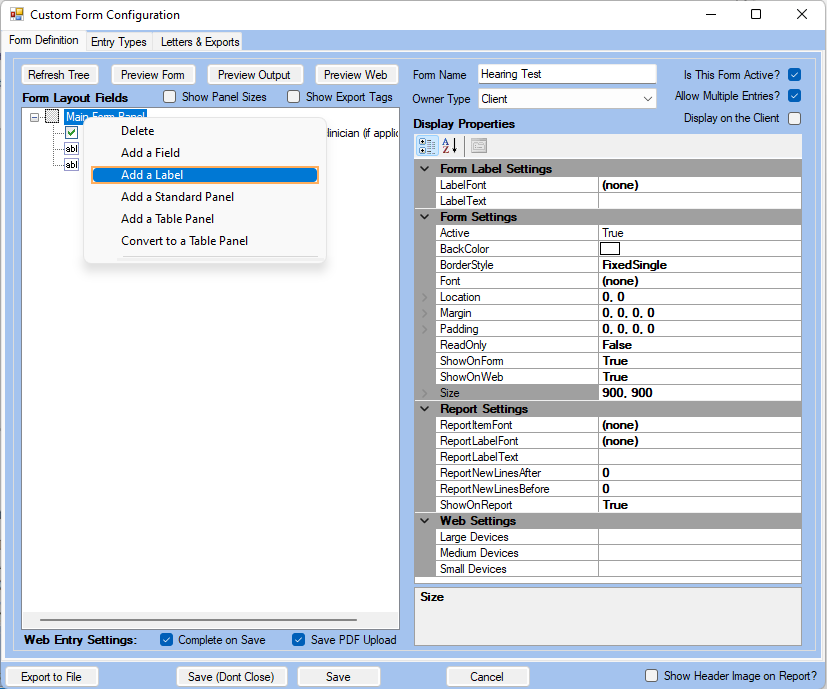
1. You can add Labels to your form to make it clearer and have a better organization. Right-click on the Main Form Panel and select Add a Label.
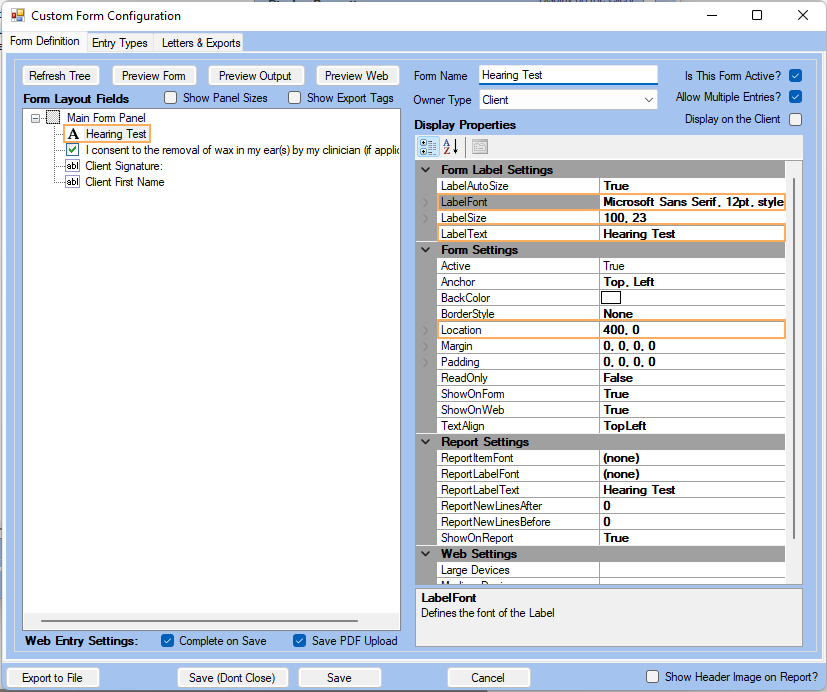
2. Set a LabelText. Also, set LabelFont and Location.
3. You can click on Preview Form at any point to see how your form is changing. Let's add a couple more Labels and see their previews. For our example, we are going to set the Label Font and Location.
Check Boxes
Use this field if you want to provide an optional question on your assessment or a set of options with multiple possible answers to be selected (For multiple options select Check Box Group).
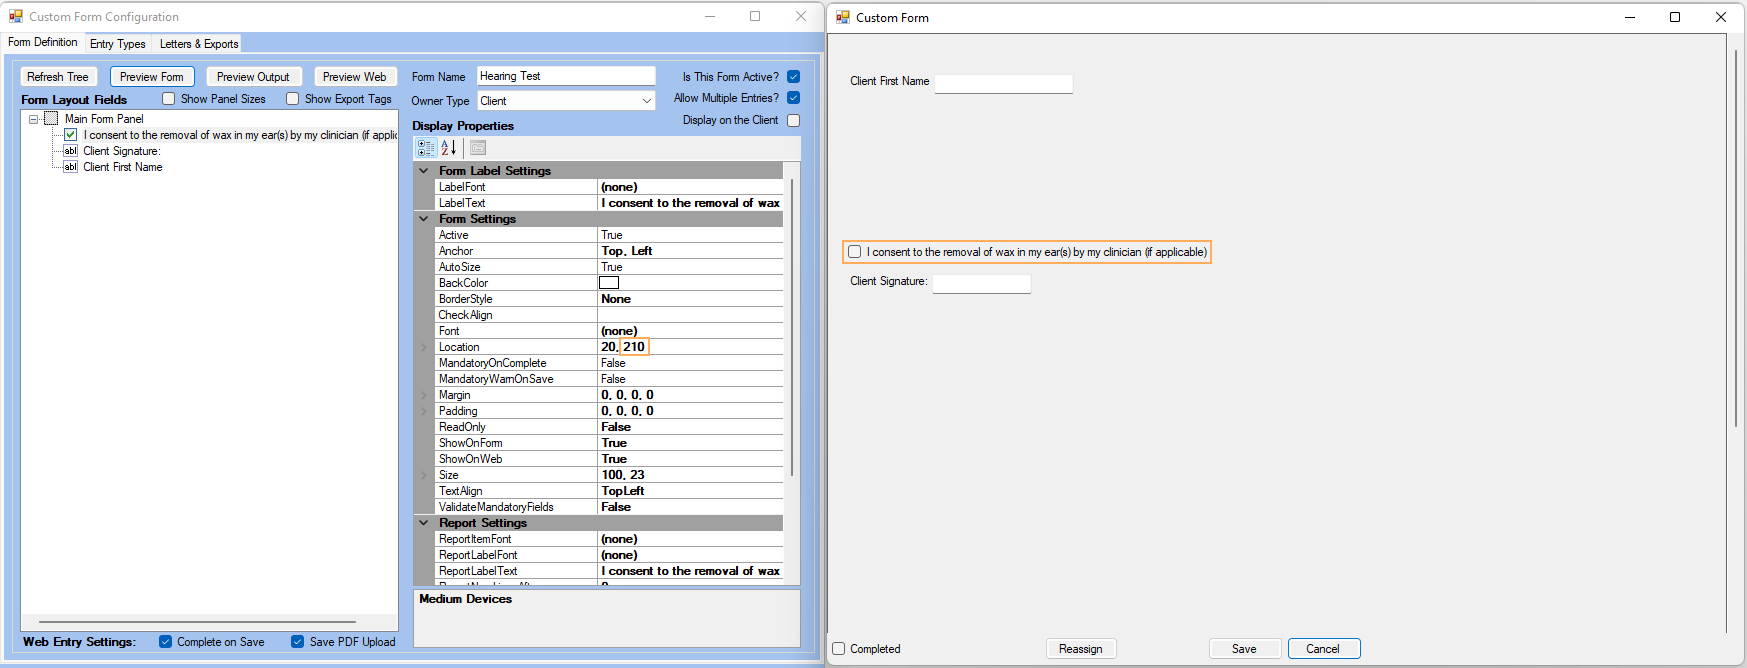
To do so, right-click on the Main Form Panel >> Select Add a Field >> On Form Fields, click on the Check Box option >> Give it a name (e.g. I consent to the removal of wax in my ear(s)...) and click on Save.
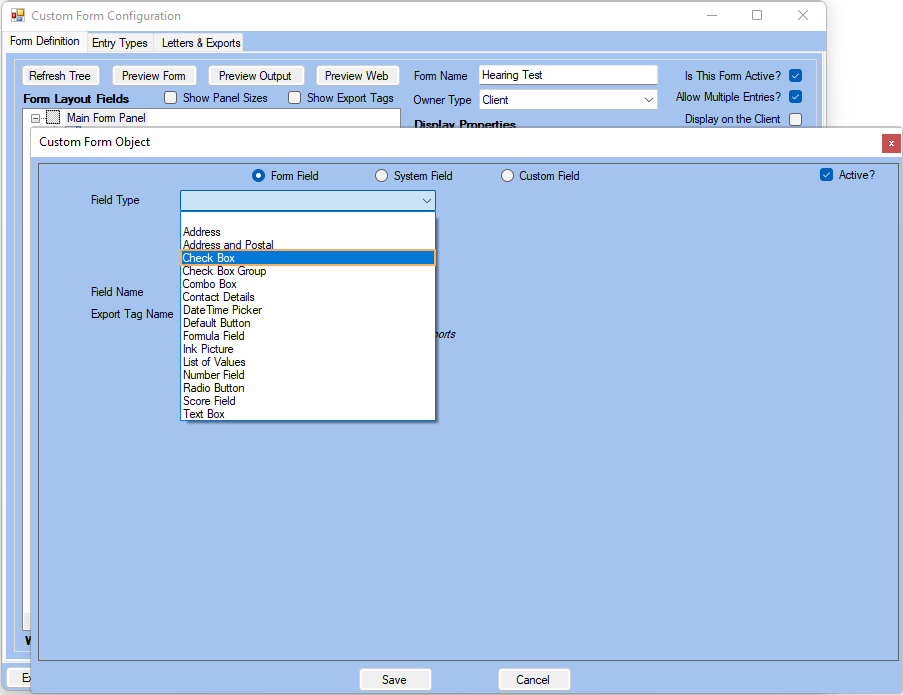
For our example, we are going to set the Location.
Note: Remember to set a label text and appropriate Display Properties if needed for AEM.
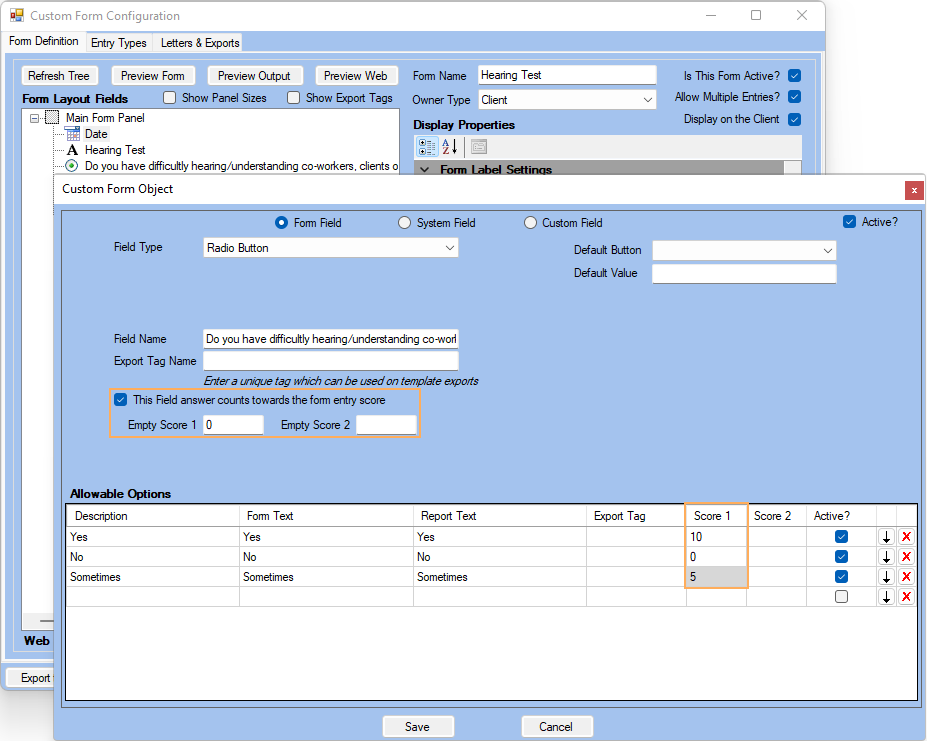
Radio Buttons
Use this field if you want to provide an optional question on your assessment or a set of options with only one possible answer to be selected.
To do so, right-click on the Main Form Panel >> Select Add a Field >> On Form Field >> Field Type, click on the Radio Button option >> Give it a name (e.g. Do you have difficulty hearing...) >> Add options under the Allowable Options table and click on Save.
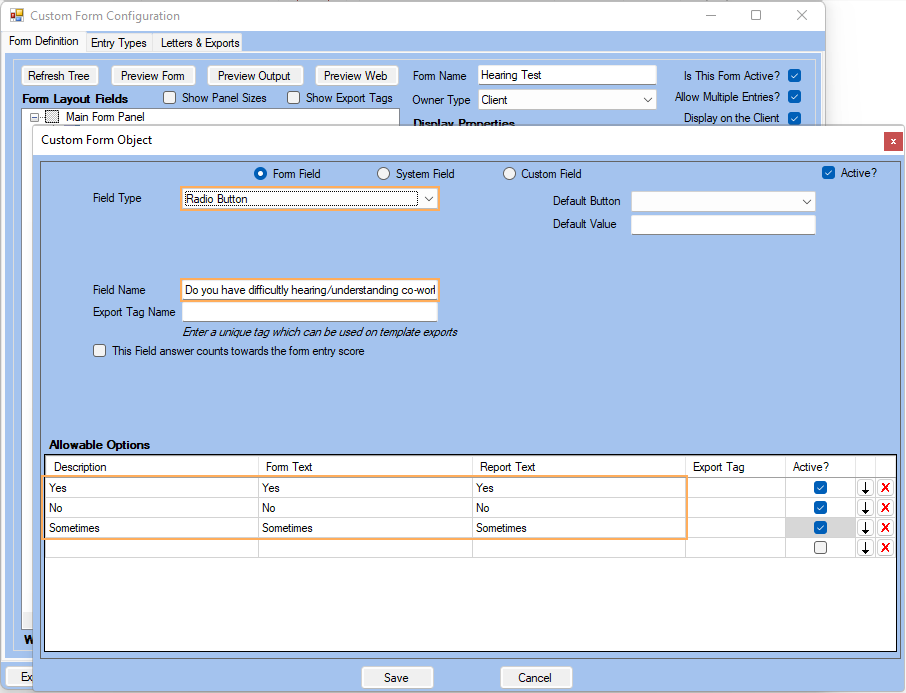
For our example, we are going to set the Location.
Note: Remember to set a label text and appropriate Display Properties.
Date Pickers
Use this field if you want to provide a Calendar widget so the client chooses a date based on what your assessment requires.
To do so, right-click on the Main Form Panel >> Select Add a Field >> On Form Field>> Field Type, click on the Date Picker option >> Give it a name (e.g. Date) and click on Save.
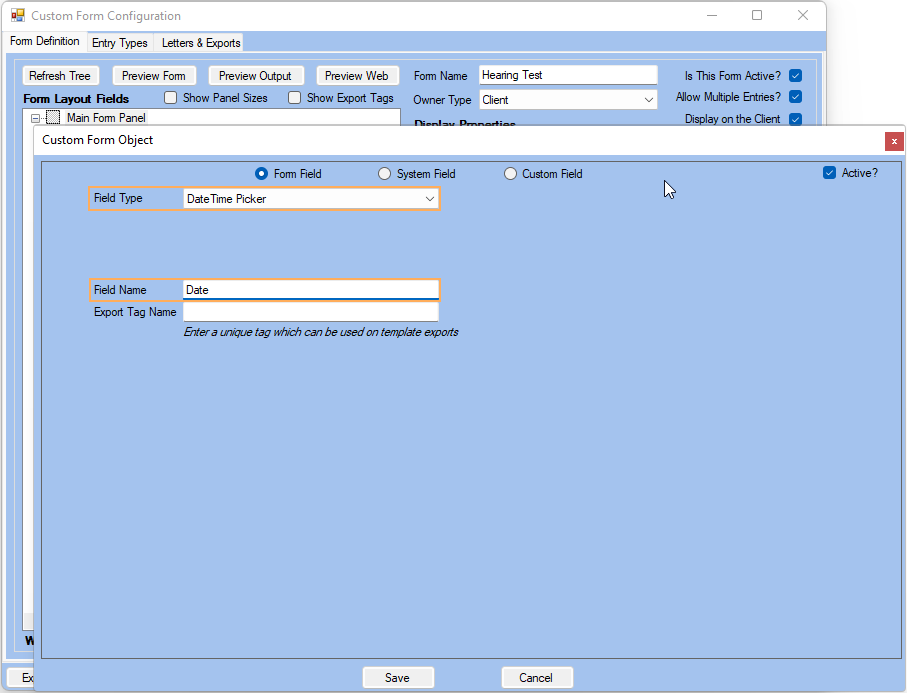
For our example, we are going to set the Location.
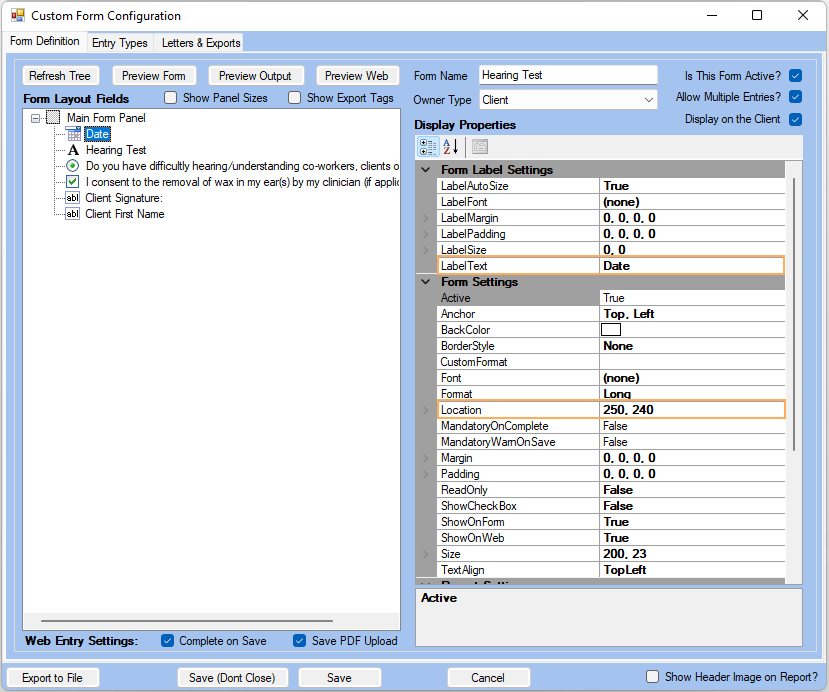
Note: Remember to set a label text and appropriate Display Properties if needed for AEM.
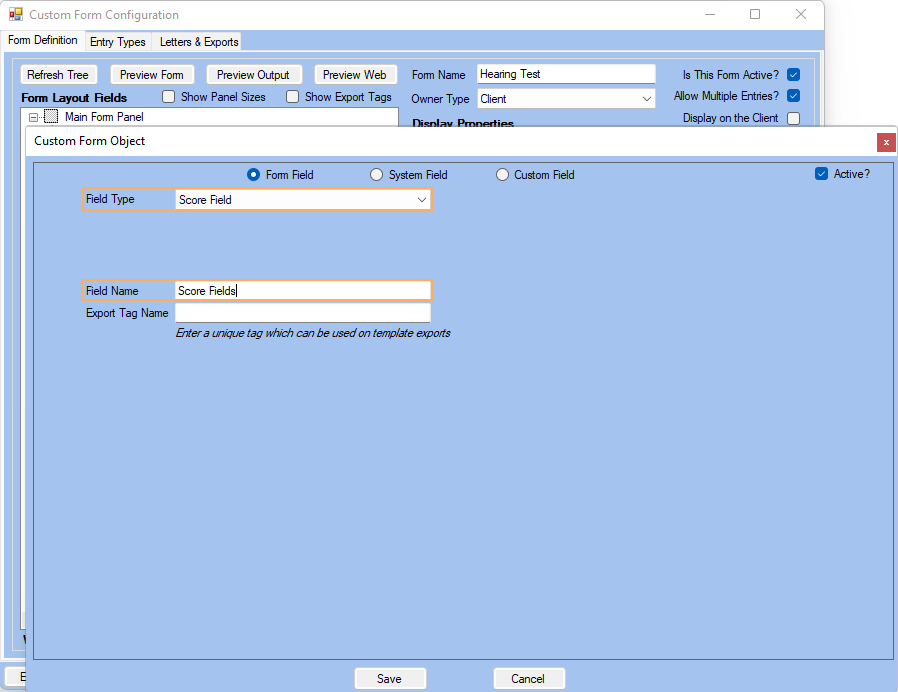
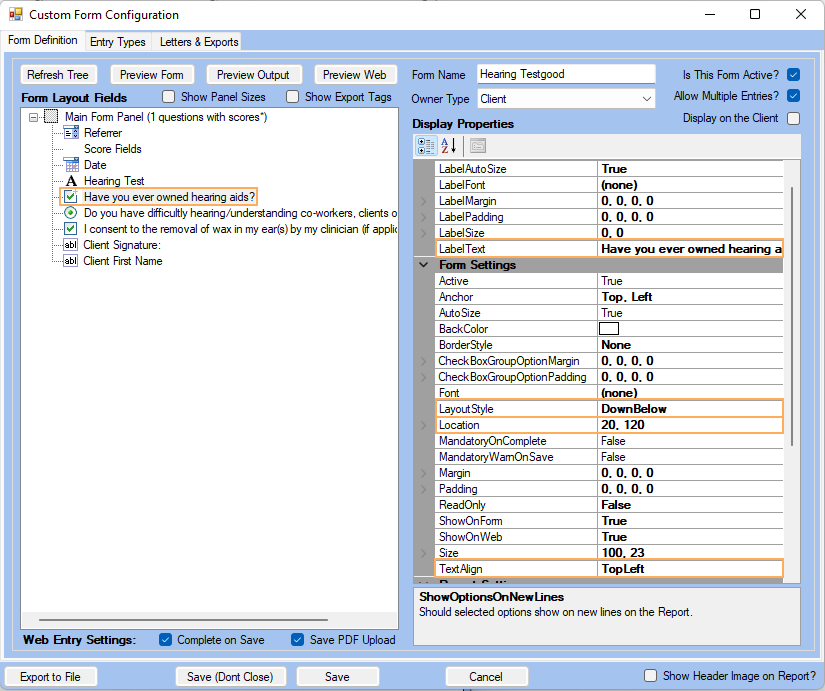
Score Fields
Use this field if you want to assign numeric values to fields in your form and then compute a score. For example, an assessment might comprise a set of questions that after having being completed will count towards a displayed score on the assessment. For the form we have been creating throughout this topic, we will create a score field (e.g. General Health Index) and assign numeric values to the Check Box and the Radio Button fields.
To do so, first edit the fields that will be computed in the score field. For our case those will be Do you have difficultly hearing/understanding co-workers, clients or customers?
Right-click on the field and select Edit >> Fields that can be counted towards a Score have a check box called "This field answer counts towards the form entry score", tick this check box >> Assign a value for each option according to your needs >> Click Save
Now, to create the Score Field, right-click on the Main Form Panel >> Add a Field >> On the Form Fields section, for the Field Type drop-down, select Score Field >> Set a Field Name and then click on Save.
Finally, select the score field created and on the Properties panel, scroll down to Score Settings >> Click on the blank field next to ScoreableFieldsList >> Select the fields that you want to be taken towards your score field and click Save.
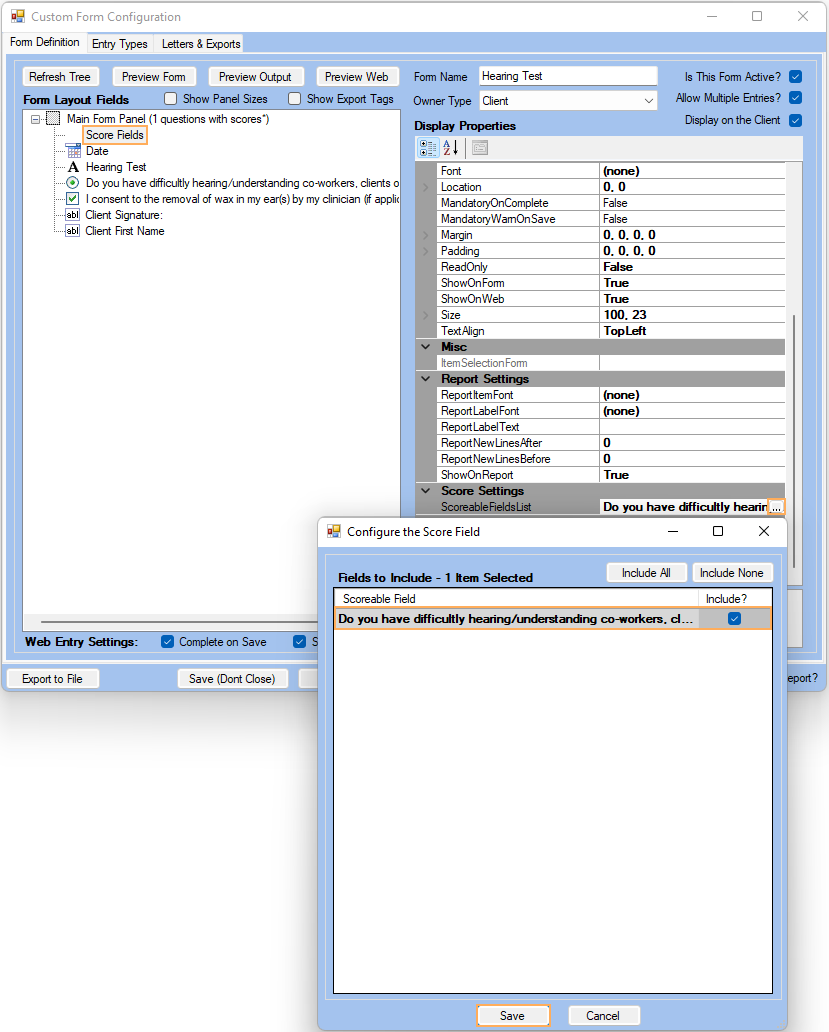
Now, when the scoreable fields are completed, the score field will count their numeric values to compute the desired score.
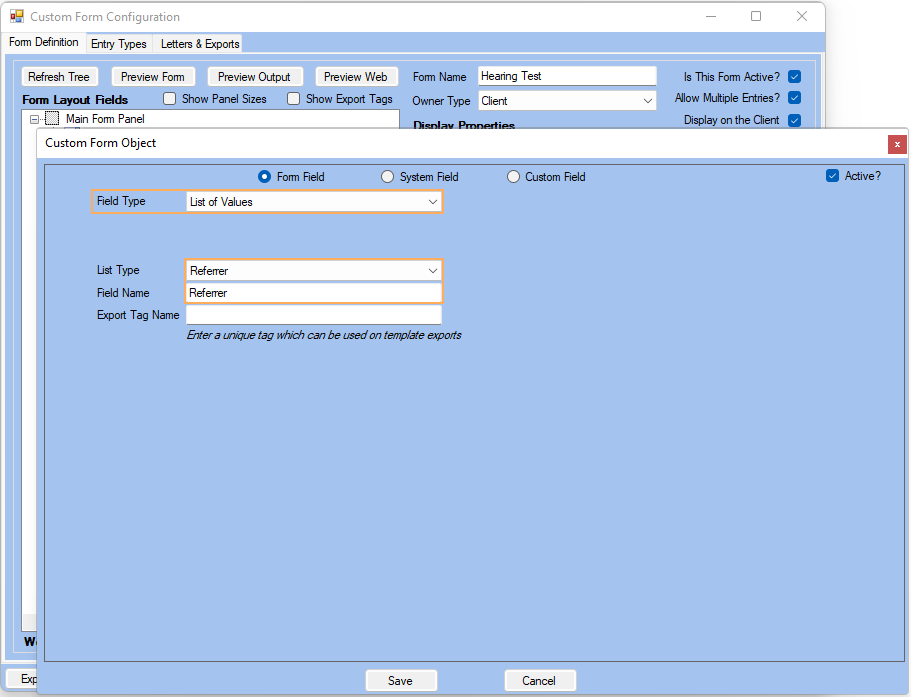
List of Values
Use this field if you want the client to select from a list of options that come from AEM (e.g. Ethnic group, Provider, Referrer).
To do so, right-click on the Main Form Panel >> Select Add a Field >> On Form Fields, for the Field Type drop-down select the List of Values option (For our example we will choose Referrer) >> Give it a name (e.g. Referrer) and click on Save.
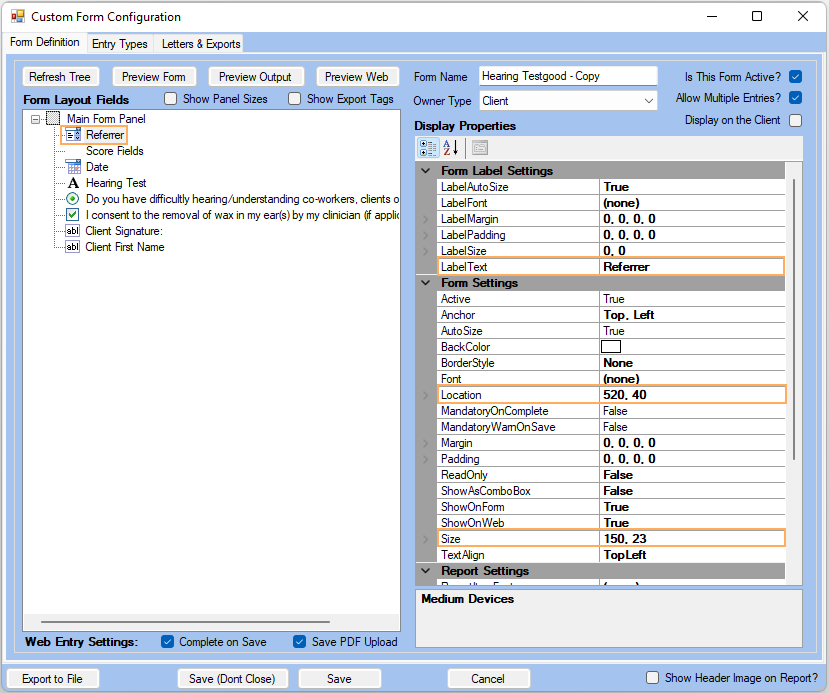
For our example, we are going to set the Location and Size.
There are more Form Fields you can use to complement your Custom Forms. We invite you to try and test them out according to your needs. Let's preview how our form is shaping up with the fields we have added so far. Click on Preview Form.

Check Box Group
Use this field if you want to provide an optional question on your assessment or a set only one option or multiple possible answers to be selected.
To do so, right-click on the Main Form Panel >> Select Add a Field >> On Form Field >> Field Type, click on the Combo Box option >> Give it a name (e.g. Have you ever owned hearing aids?) >> Add options under the Allowable Options table and click on Save.
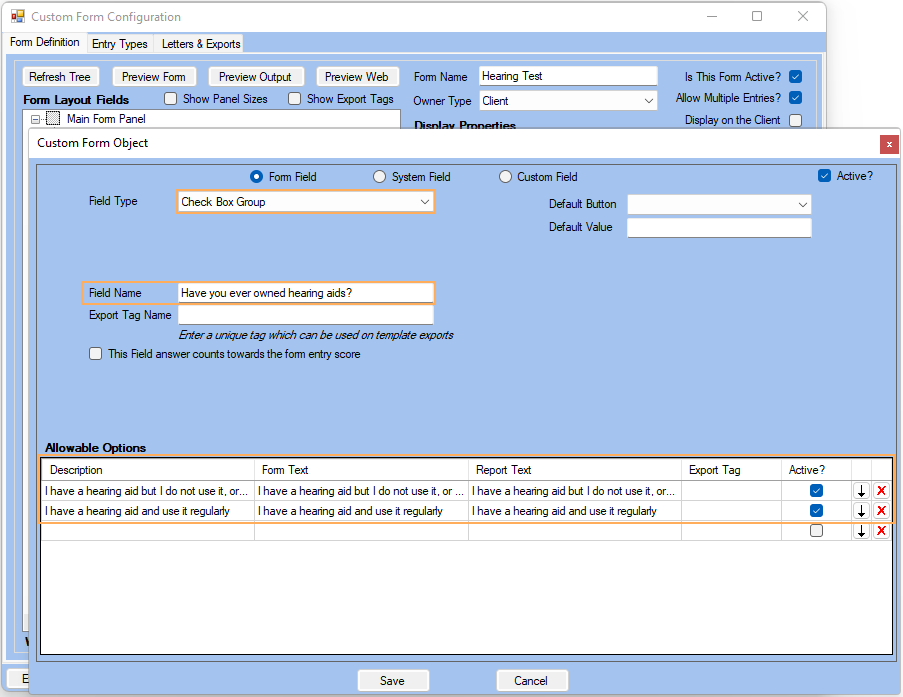
For our example, we are going to set the Location, Layout Style and Text Align.
Combo Box
Use this field if you want to provide an optional question on your assessment or set only one option and what to be displayed as a drop-down
To do so, right-click on the Main Form Panel >> Select Add a Field >> On Form Field >> Field Type, click on the Combo Box option >> Give it a name (e.g. Please tick where on a scale of 1 to 10, where do you feel that you are (psychologically, emotional?) >> Add options under the Allowable Options table and click on Save.
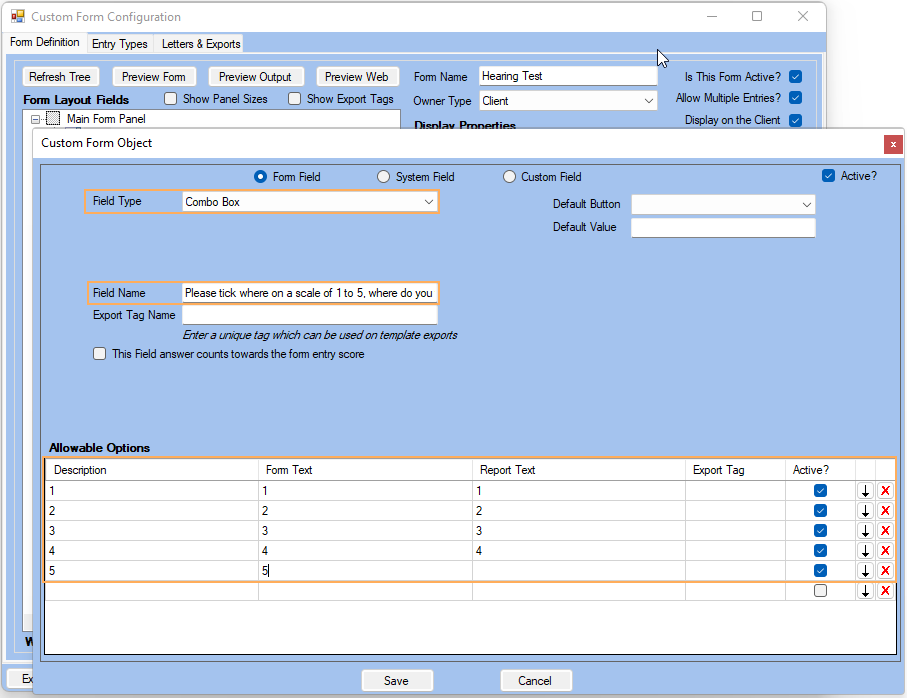
For our example, we are going to set the Location and Style and finally click on Save.
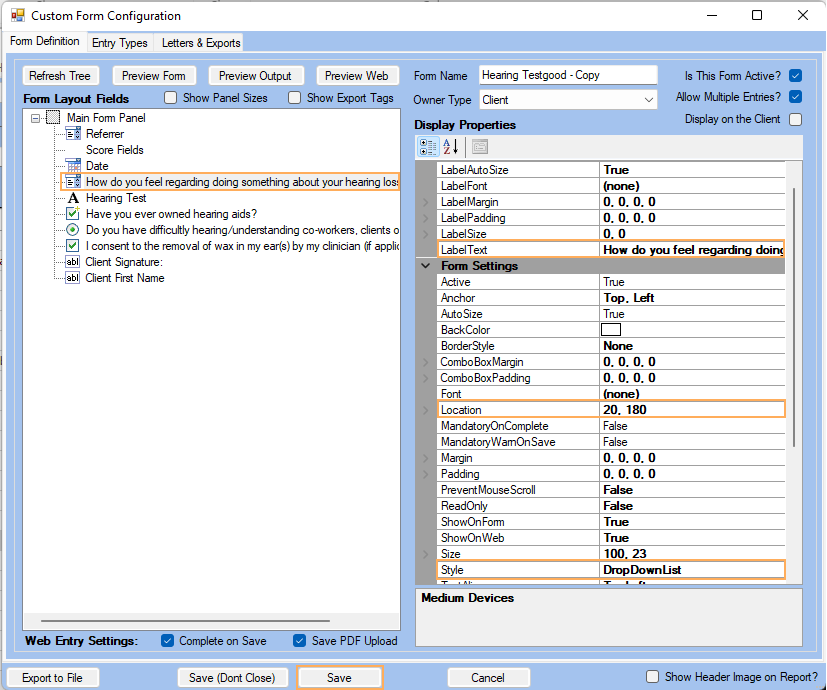
Finally we are going to preview the form with all fields included:
Including Custom Forms into the Client Screen
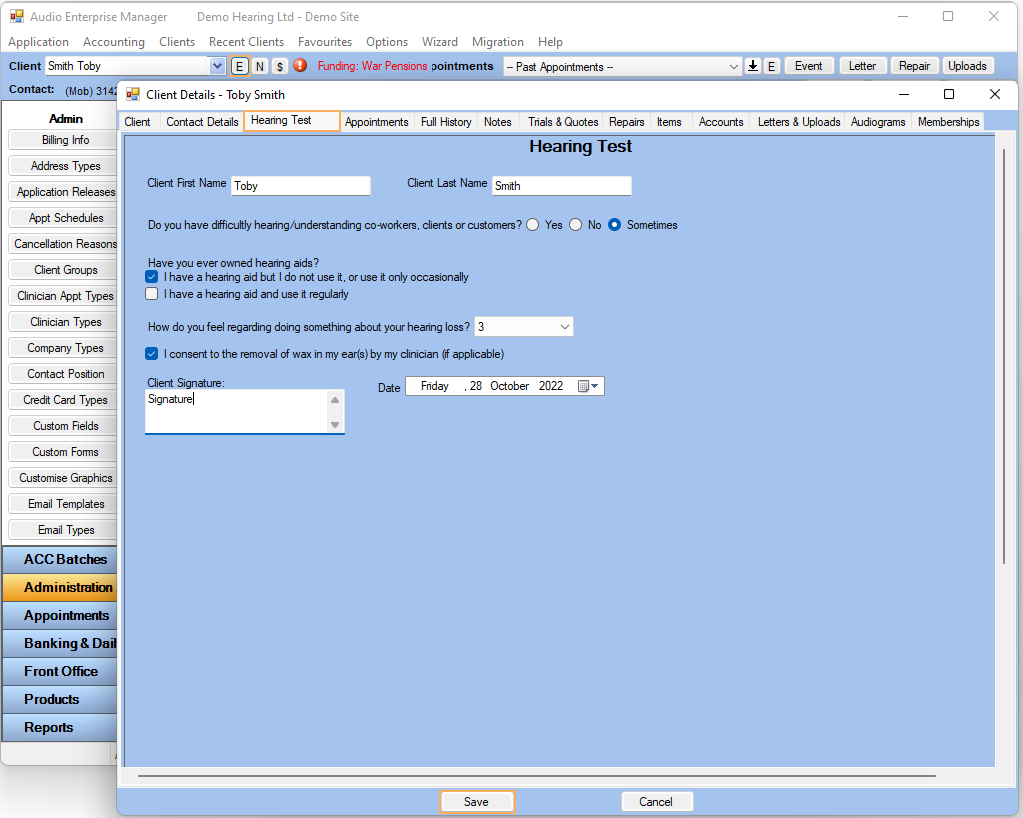
- If you want to include a custom form as a tab in the Client screen, please go to Administration >> Custom Forms >> Create a Custom Form with only System Fields and/or Custom Fields. Edit the Custom Form >> Tick Display on the Client >> Save
- Fill the form >> Save
- Select a Client and Click on
 to edit it
 - Click on Hearing Test tab >> Save
Creating and completing your Custom Forms
-
Select a Client and Click on
to edit it -
Click on History tab >> Click on New Form Entry
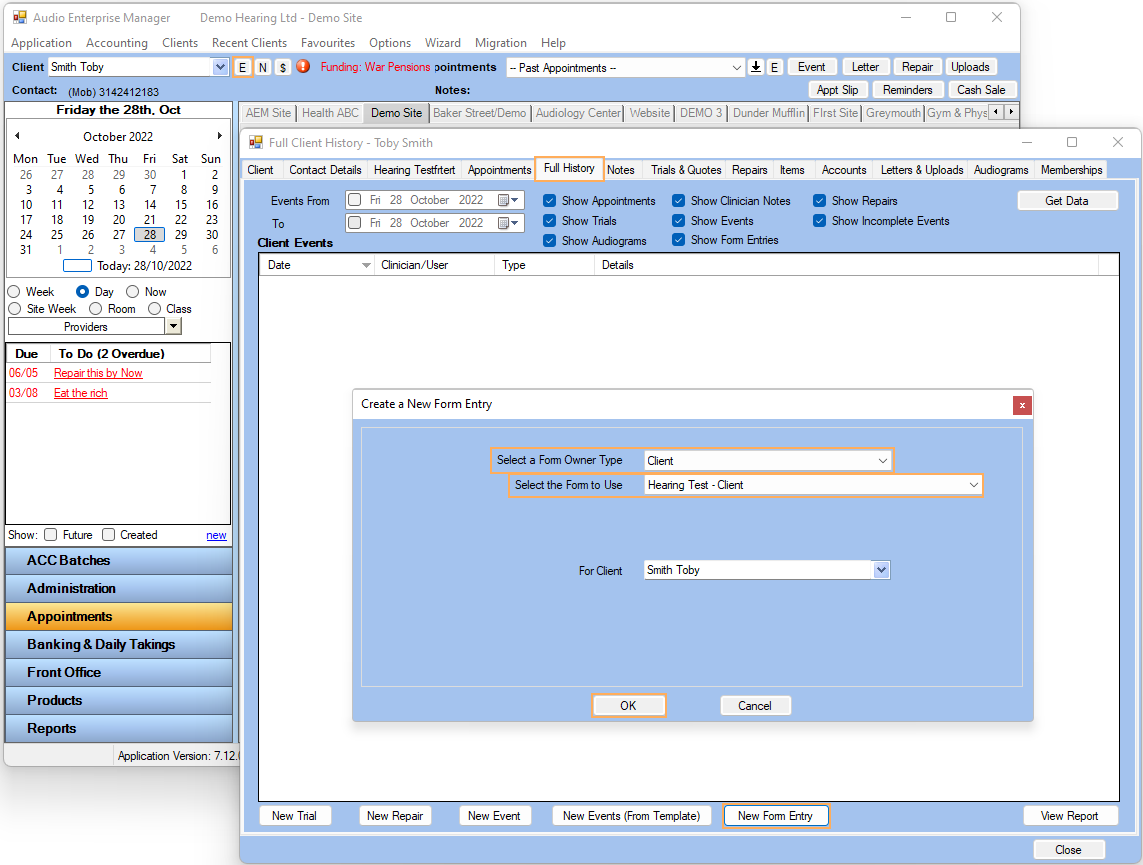
-
A new screen will be opened for each field you need to fill

![]()