![]()
How to Create a Statement Batch
You can use Audio Enterprise Manager to create Statements for Debtors as a batch.
Statements provide a list of all the outstanding items owing by debtors which can then be sent by post or email to the debtors.
Follow this step-by-step guide to learn how to create a Statement Batch:
- Go to Accounting Form >> Money In >> Statement Batches (or Front Office >> Statements Batches)
- Click New Batch

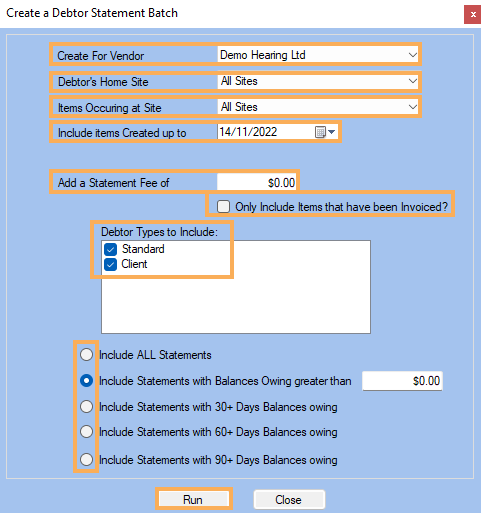
The Create
a Debtor Statement Batch screen
will open where you can specify the item(s) to be included in the statement:
Please use the fields on this window
to filter the data that will be included in the statement batch:
-
Create For Company : This filter allows you to run the statement for a specific Vendor.
-
Debtor's Home Site: This filter allows you to run the statement for a specific Debtor's Home Site.
-
Items Occurring at Site: This filter allows you to run the statement for a specific Site where the items occurred at.
-
Include items Created up to: This filter allows you to select a date to run the statement for. The statement will include all the items created up to the date selected.
-
Add a Statement Fee of: This filter allows you to add a statement fee to the statement.
-
Only Include Items that have been Invoiced?: Allows for the Statement Batch to show only Appointments that have been invoiced.
-
Debtor Types to Include: This filter allows you to specify whether Standard (Third Party) and/or Client debtors should be included in the statement batch.
-
There are five Include Statements options to choose from:
-
-
-
Include All Statements: This filter allows you to specify whether all statements should be included in the statement.
-
Include Statements with Balances Owing greater than: This filter allows you to specify whether the statements with balances owing greater than the specified amount should be included in the statement. Note: You will be able to specify this value, which will be $0.00 by default.
-
Include Statements with 30+ Days Balances owing: This filter allows you to specify whether the statements with more than 30 days balances owing should be included in the statement.
-
Include Statements with 60+ Days Balances owing: This filter allows you to specify whether the statements with more than 60 days balances owing should be included in the statement.
-
Include Statements with 90+ Days Balances owing: This filter allows you to specify whether the statements with more than 90 days balances owing should be included in the statement.
-
-
-
Click Run to generate the statement batch as a report:
-
-
-
Use the navigation arrows to navigate through the statements in the batch
-
Click on
 to print
the statement
to print
the statement -
Click on
 to email the statement.
-
-
-
Once the Statement Batch has been created, it will be listed under Front Office >> Statement Batches >> Get Data. (or Accounting Form >> Money In >> Statement Batches >> Get Data)
NOTE!
You can either email individual statements or email a statement batch to all clients/debtors that have email addresses and run the batch report to exclude clients with no email addresses so those ones can be posted.
Once the statements are successfully emailed, an event is automatically created and associated per each statement.
For more information see: How to Email Statement Batches
-
Each individual debtor/client statement can also be viewed and printed as shown below:
For Clients:
I Select
a client and click on ![]() to open the Client Details window
to open the Client Details window
II Go to the Accounts >> Statements tab
III Locate
the individual statement and click on ![]() to view the
report.
to view the
report.
For Debtors:
I Go to Accounting Form >> Money In >> Debtor Statements
II Filter the search (Debtor, Date Range) and click on Get Data
III Locate
the individual statement and click on ![]() to view the
report.
to view the
report.
![]()